AWS QuickStart Step 1
The AWS QuickStart walks you through configuring your Spinnaker instance hosted on AWS to deploy to AWS.
Note
This guide assumes that Spinnaker is installed with Halyard, not Operator.Prerequisites
Before you start, ensure that you complete the following requirements:
- Have your AWS Account number available in a text editor*
- Have Minnaker installed on AWS. For more information about Minnaker, see Minnaker.
- SSH into your Minnaker Instance with AWS keys
Need help setting this up? - For a guided tutorial, watch the Video Walkthrough at the bottom of this document.
Prepare AWS by creating Roles, Permissions, and Trust
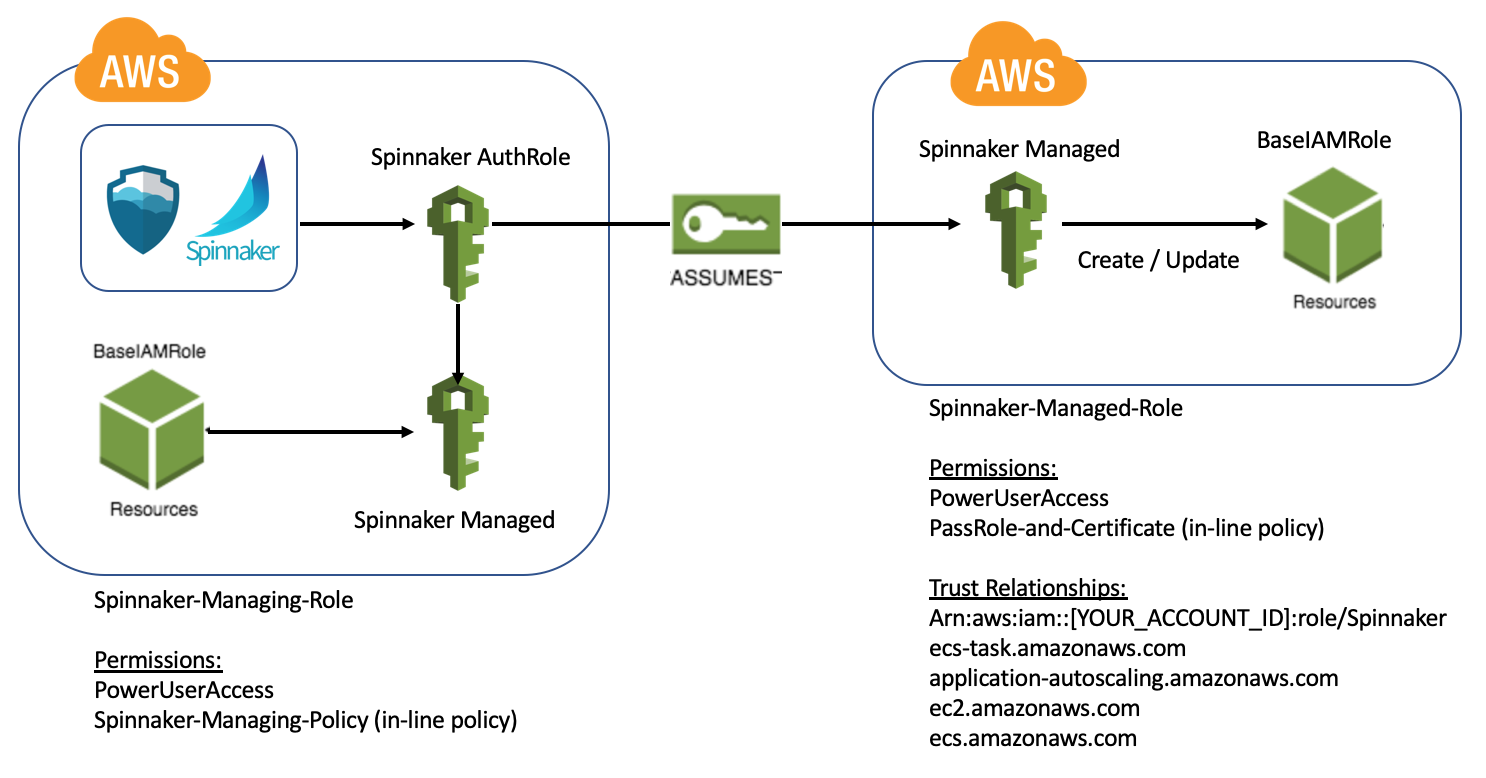
In this step, we configure 2 AWS Roles to enable Spinnaker to deploy to your AWS environment
Create - “Spinnaker-Managed-Role” in AWS Console -> IAM -> Roles.
Bind “PowerUserAccess” to “Spinnaker-Managed-Role” in Permissions.
“PassRole-and-Certificate” (inline policy for Spinnaker-Managed-Role):
{
    "Version": "2012-10-17",
    "Statement": [
        {
            "Action": [
                "iam:ListServerCertificates",
                "iam:PassRole"
            ],
            "Resource": [
                "*"
            ],
            "Effect": "Allow"
        }
    ]
}
Create - “Spinnaker-Managing-Role”.
Bind “PowerUserAccess” to “Spinnaker-Managing-Role”.
“BaseIAM-PassRole” (Create as inline policy on “Spinnaker-Managing-Role”). You must replace [YOUR_AWS_ACCOUNT_ID] with your actual AWS account id.
{
    "Version": "2012-10-17",
    "Statement": [
        {
            "Effect": "Allow",
            "Action": [
                "ec2:DescribeAvailabilityZones",
                "ec2:DescribeRegions"
            ],
            "Resource": [
                "*"
            ]
        },
        {
            "Action": "sts:AssumeRole",
            "Resource": [
                "arn:aws:iam::[YOUR_AWS_ACCOUNT_ID]:role/Spinnaker-Managed-Role"
            ],
            "Effect": "Allow"
        }
    ]
}
Spinnaker-Managed-Role -> Trust relationship
Now, “Spinnaker-Managed-Role” must have Trust relationship with “Spinnaker-Managing-Role”. You must replace [YOUR_AWS_ACCOUNT_ID] with your actual AWS account id.
{
    "Version": "2012-10-17",
    "Statement": [
    {
        "Effect": "Allow",
        "Principal": {
        "AWS": "arn:aws:iam::[YOUR_AWS_ACCOUNT_ID]:role/Spinnaker-Managing-Role",
        "Service": [
            "ecs.amazonaws.com",
            "application-autoscaling.amazonaws.com",
            "ecs-tasks.amazonaws.com",
            "ec2.amazonaws.com"
        ]
        },
        "Action": "sts:AssumeRole"
    }
    ]
}
Bind “Spinnaker-Managing-Role” to Minnaker Instance in AWS Console
Locate your Minnaker EC2 instance in the AWS Console and click Action > Instance Settings > Attach Replace IAM Role.
From the dropdown menu, find “Spinnaker-Managing-Role” and click Apply to bind the Role to the Minnaker Instance.
Login to your Minnaker EC2 Instance with SSH (Outside of Halyard Container)
Verify Roles are configured correctly
Download the aws-cli:
sudo snap install aws-cli --classicVerify “Spinnaker-Managing-Role”:
aws sts get-caller-identityThe command returns output similar to the following output:
ubuntu:~$ aws sts get-caller-identity
{
    "UserId": "AROA3SQXSP.............7893f355",
    "Account": "[YOUR_AWS_ACCOUNT_ID]",
    "Arn": "arn:aws:sts::[YOUR_AWS_ACCOUNT_ID]:assumed-role/Spinnaker-Managing-Role/i-0e.........7893f355"
}
Verify that Spinnaker Managing Role can Assume Managing Role:
aws sts assume-role --role-arn arn:aws:iam::[YOUR_AWS_ACCOUNT_ID]:role/Spinnaker-Managed-Role --role-session-name testThe command returns output similar to the following output:
ubuntu:~$ aws sts assume-role --role-arn arn:aws:iam::[YOUR_AWS_ACCOUNT_ID]:role/Spinnaker-Managed-Role --role-session-name test
{
    "Credentials": {
        "Expiration": "2020-01-09T01:03:05Z",
        "AccessKeyId": "AWS_ACCESS_KEY",
        "SecretAccessKey": "AWS_SECRET_ACCESS_KEY",
        "SessionToken": "FwoGZXIvYXdzEGEaDEyTECcALWUjAgy0GyKoAZ5PapC1qqFwN55X0vRISdtZh19mR3V9p3i5dGZugt3FQ4DNOamVgIG82I1qaspn83aBefdbpUtznN9fJxwPNoRhYinVgIXGdsTWnBuQ57U7s/cDoHosvV5+J3oZj8ffjLInzsI05IrRBiOTmqU3caEP/e+6N5nzHg/9+aS6TCWjCIzjL0mHtclBBQ7k/dijrg/5vTVFh8UGakcJL3SV6gaCHj0k6BUzEii529nwBTItq6/QISV8wfGNLQJOPDB5P3zoQkHjkpoWCEh1p0oc4hEwki8F7NutXNrg14W+"
    },
    "AssumedRoleUser": {
        "AssumedRoleId": "AROA3SQXSP6SGOWFHHJ7B:test",
        "Arn": "arn:aws:sts::[YOUR_AWS_ACCOUNT_ID]:assumed-role/Spinnaker-Managed-Role/test"
    }
}
Congratulations
You have completed the 1st step in setting up the Spinnaker AWS Provider. For Step 2, see AWS Quick Start Step 2.
Feedback
Was this page helpful?
Thank you for letting us know!
Sorry to hear that. Please tell us how we can improve.
Last modified October 17, 2023: (aa87b671)