Integrate ServiceNow with Spinnaker
Overview of ServiceNow
ServiceNow provides several workflow solutions (ITSM, PPM, Security Response, ITOM, etc). Instead of defining a single use case for an integration that satisfies some use cases, this guide reviews the various building blocks available to create integrations through a generic webhook stage or a custom webhook stage.
Consuming Webhooks in ServiceNow requires some configuration. You can read more about the process in the ServiceNow docs.
Using a custom webhook stage to create a Change Request in ServiceNow
Potential uses for creating a change request in ServiceNow include:
- A deployment happens and a ticket needs to be filed in ServiceNow for record keeping
- A canary deployment is successful, and you need a change ticket to be created and approved before full deployment into production.
In ServiceNow, you need to create a Scripted Web Service. At a high level, this service performs the following actions:
- Receives the webhook from Spinnaker
- Processes the contents of the payload
- Creates a Change Request.
A very similar approach could be taken to create a different type of ticket.
To create the Scripted Web Service, perform the following task:
Search for
Scripted REST APIsin the ServiceNow Navigator.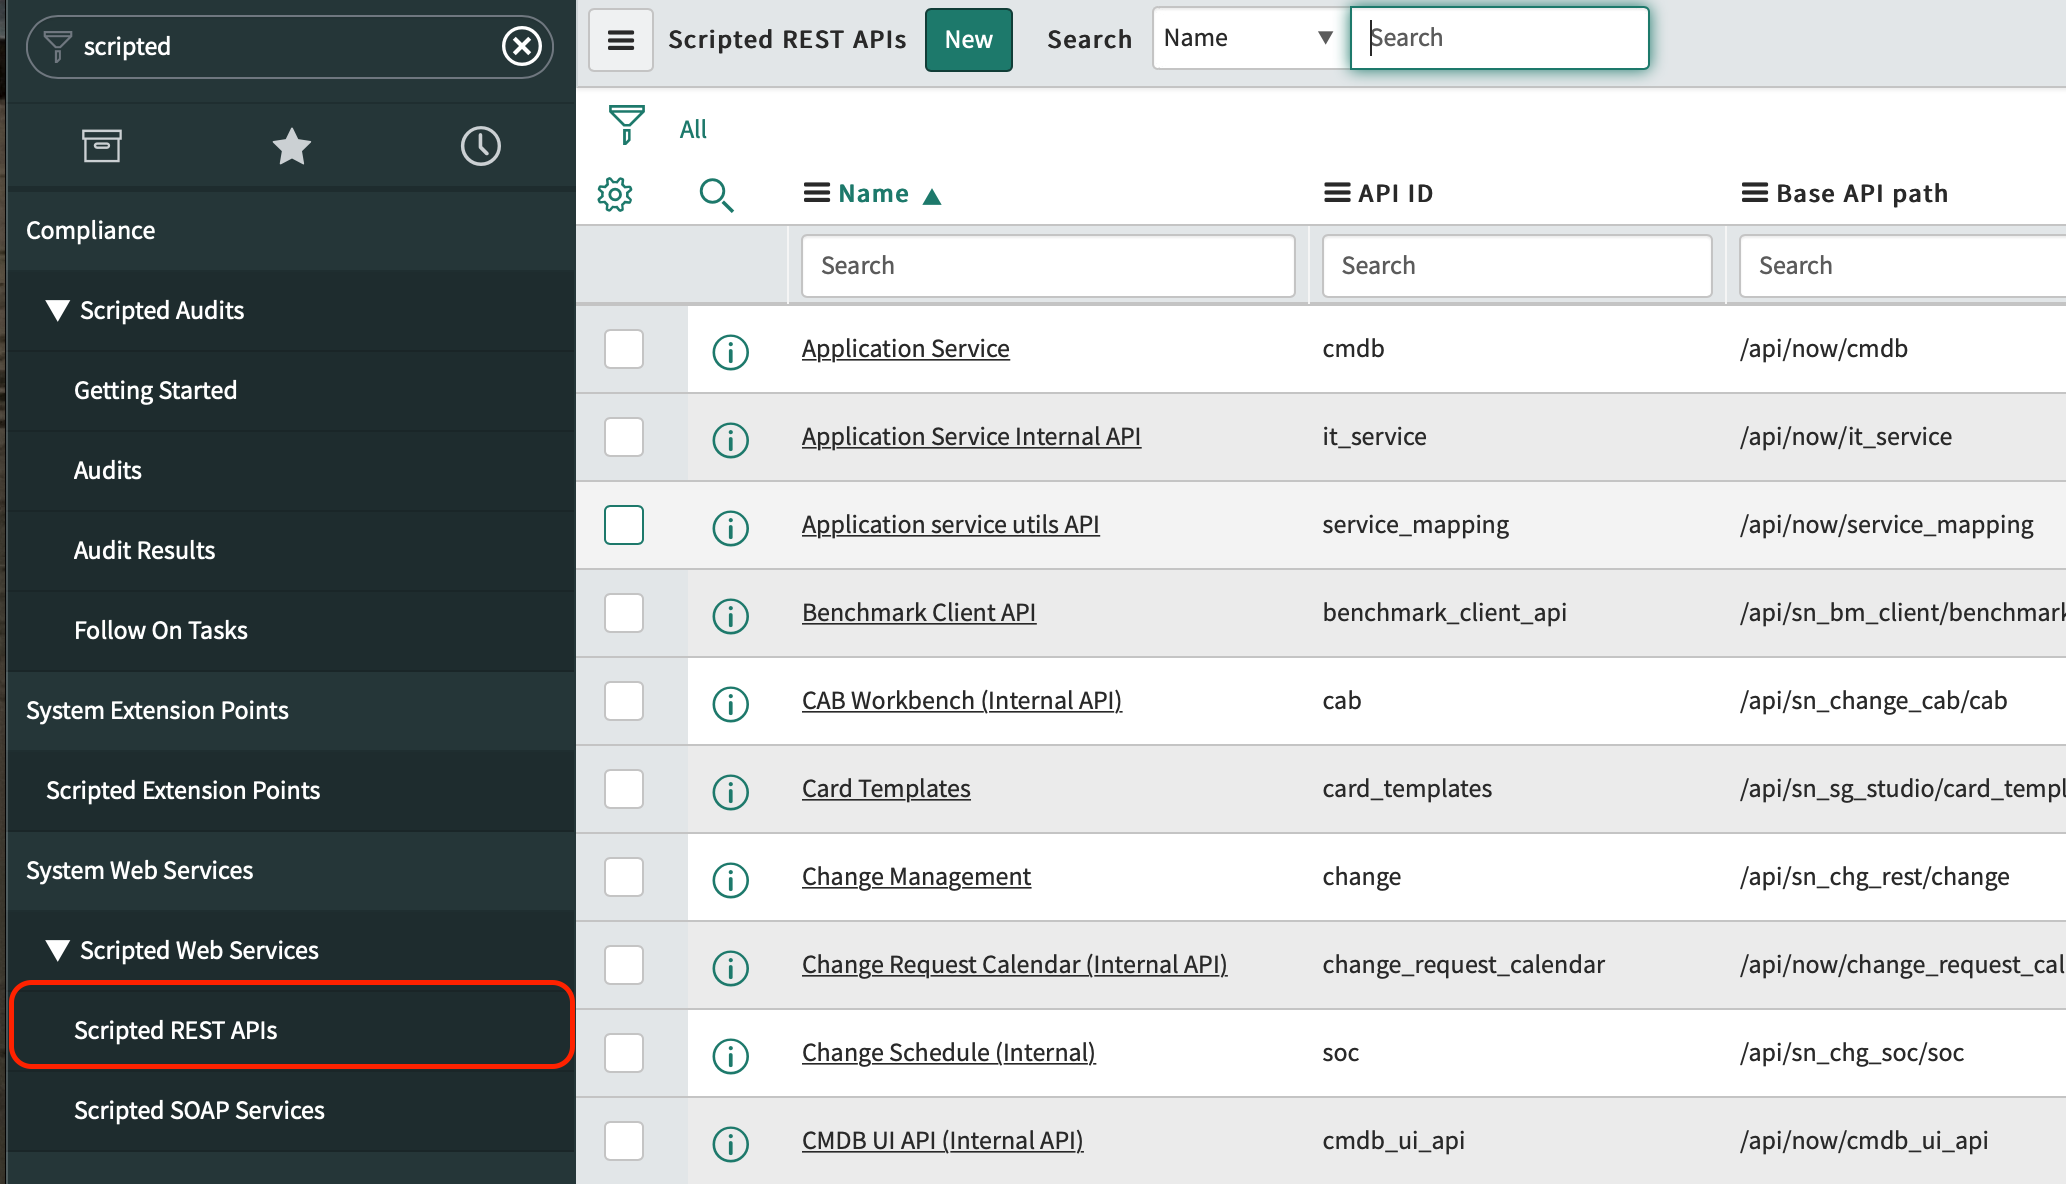
Create a new Scripted Web Service and give it a descriptive name. For example, you can name it “SpinnakerWebhookListener”.
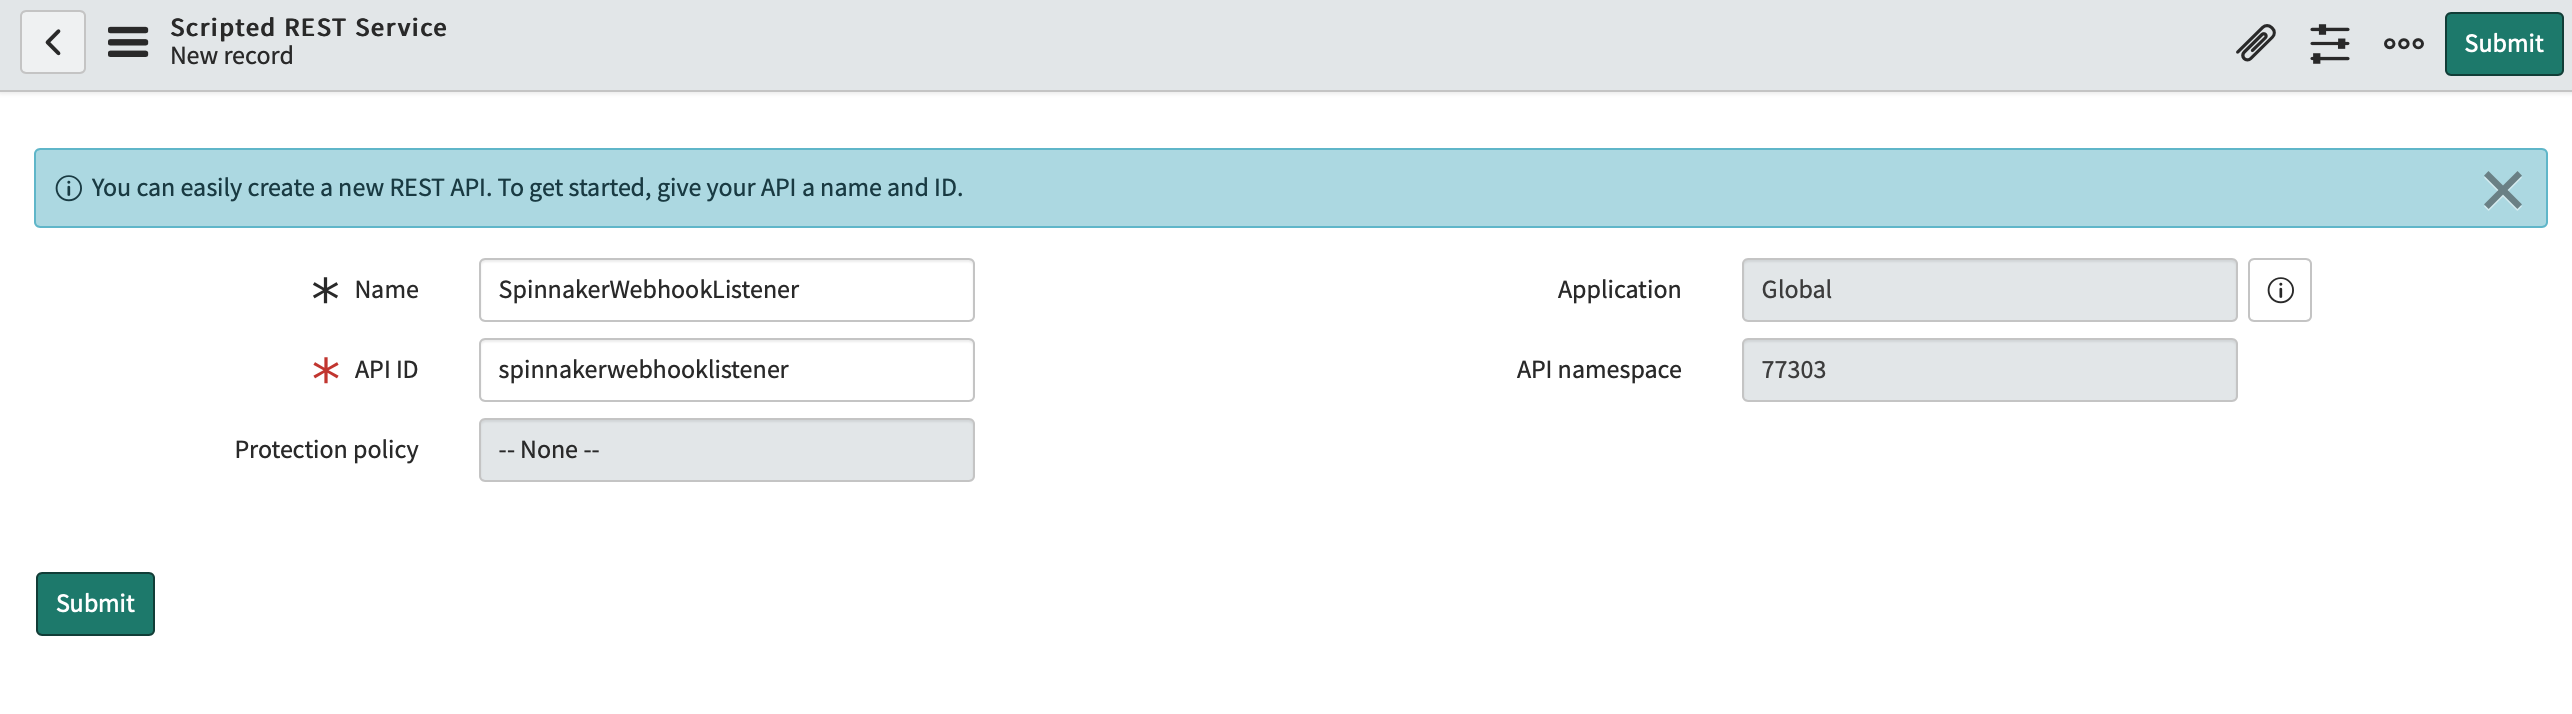
Submit the information to create the service.
Create a Resource that contains the endpoint that Spinnaker and the script to create the ticket.
You can create multiple Resources, each with its own specific URL and script to do something. In this example, the “SpinnakerWebhookListener” is the Scripted REST API that handles all the various calls that Spinnaker makes to this specific ServiceNow Instance. You define Resources to handle each specific call. For example, you may want to create separate calls to create different type of tickets or perform different actions within ServiceNow.
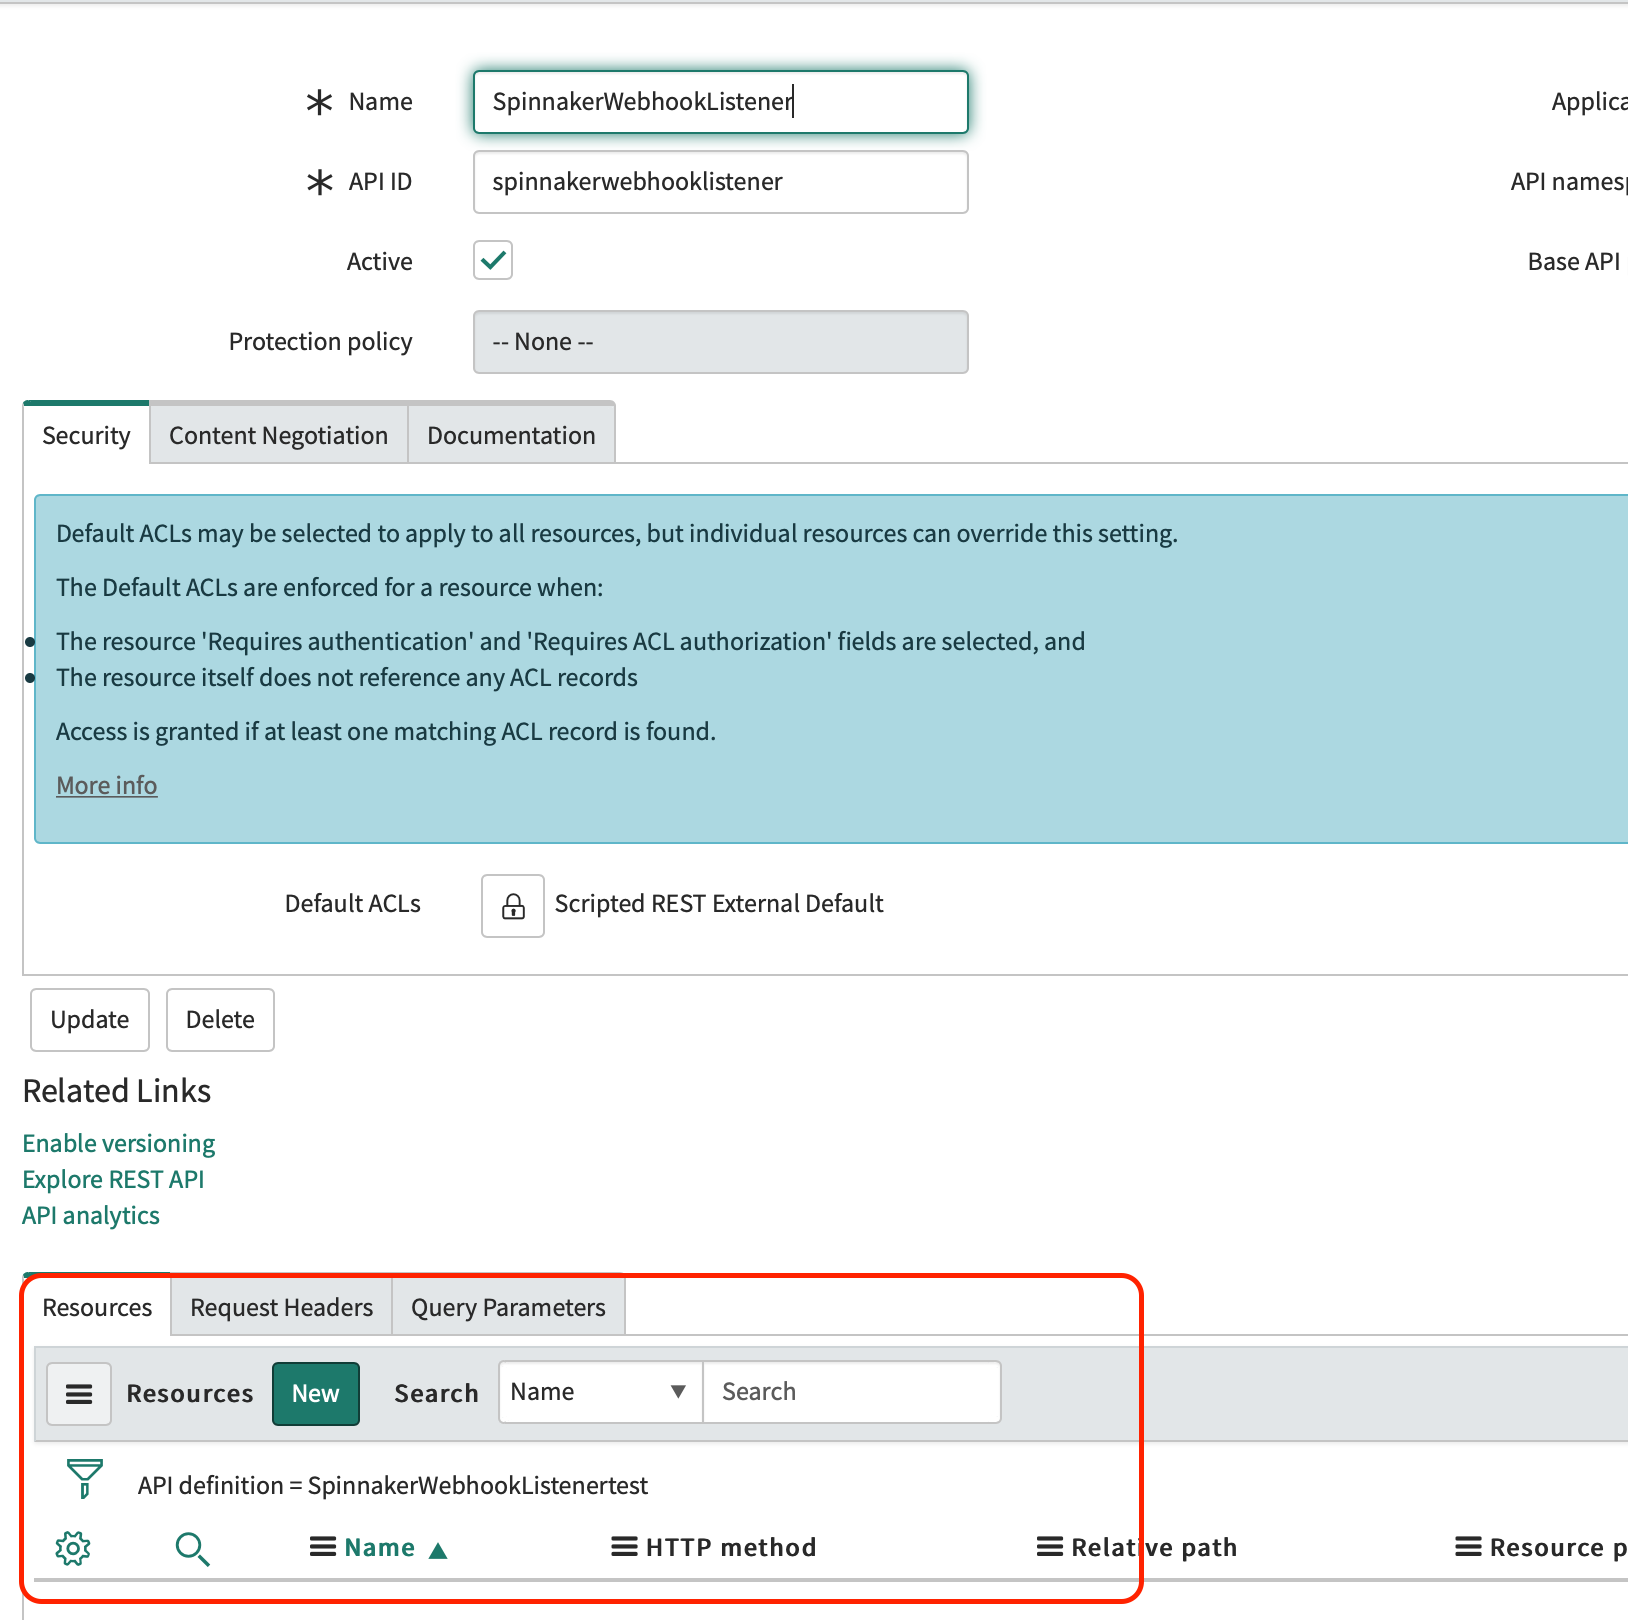
Create a new resource and give it a meaningful name. The example below uses
create-change-ticket.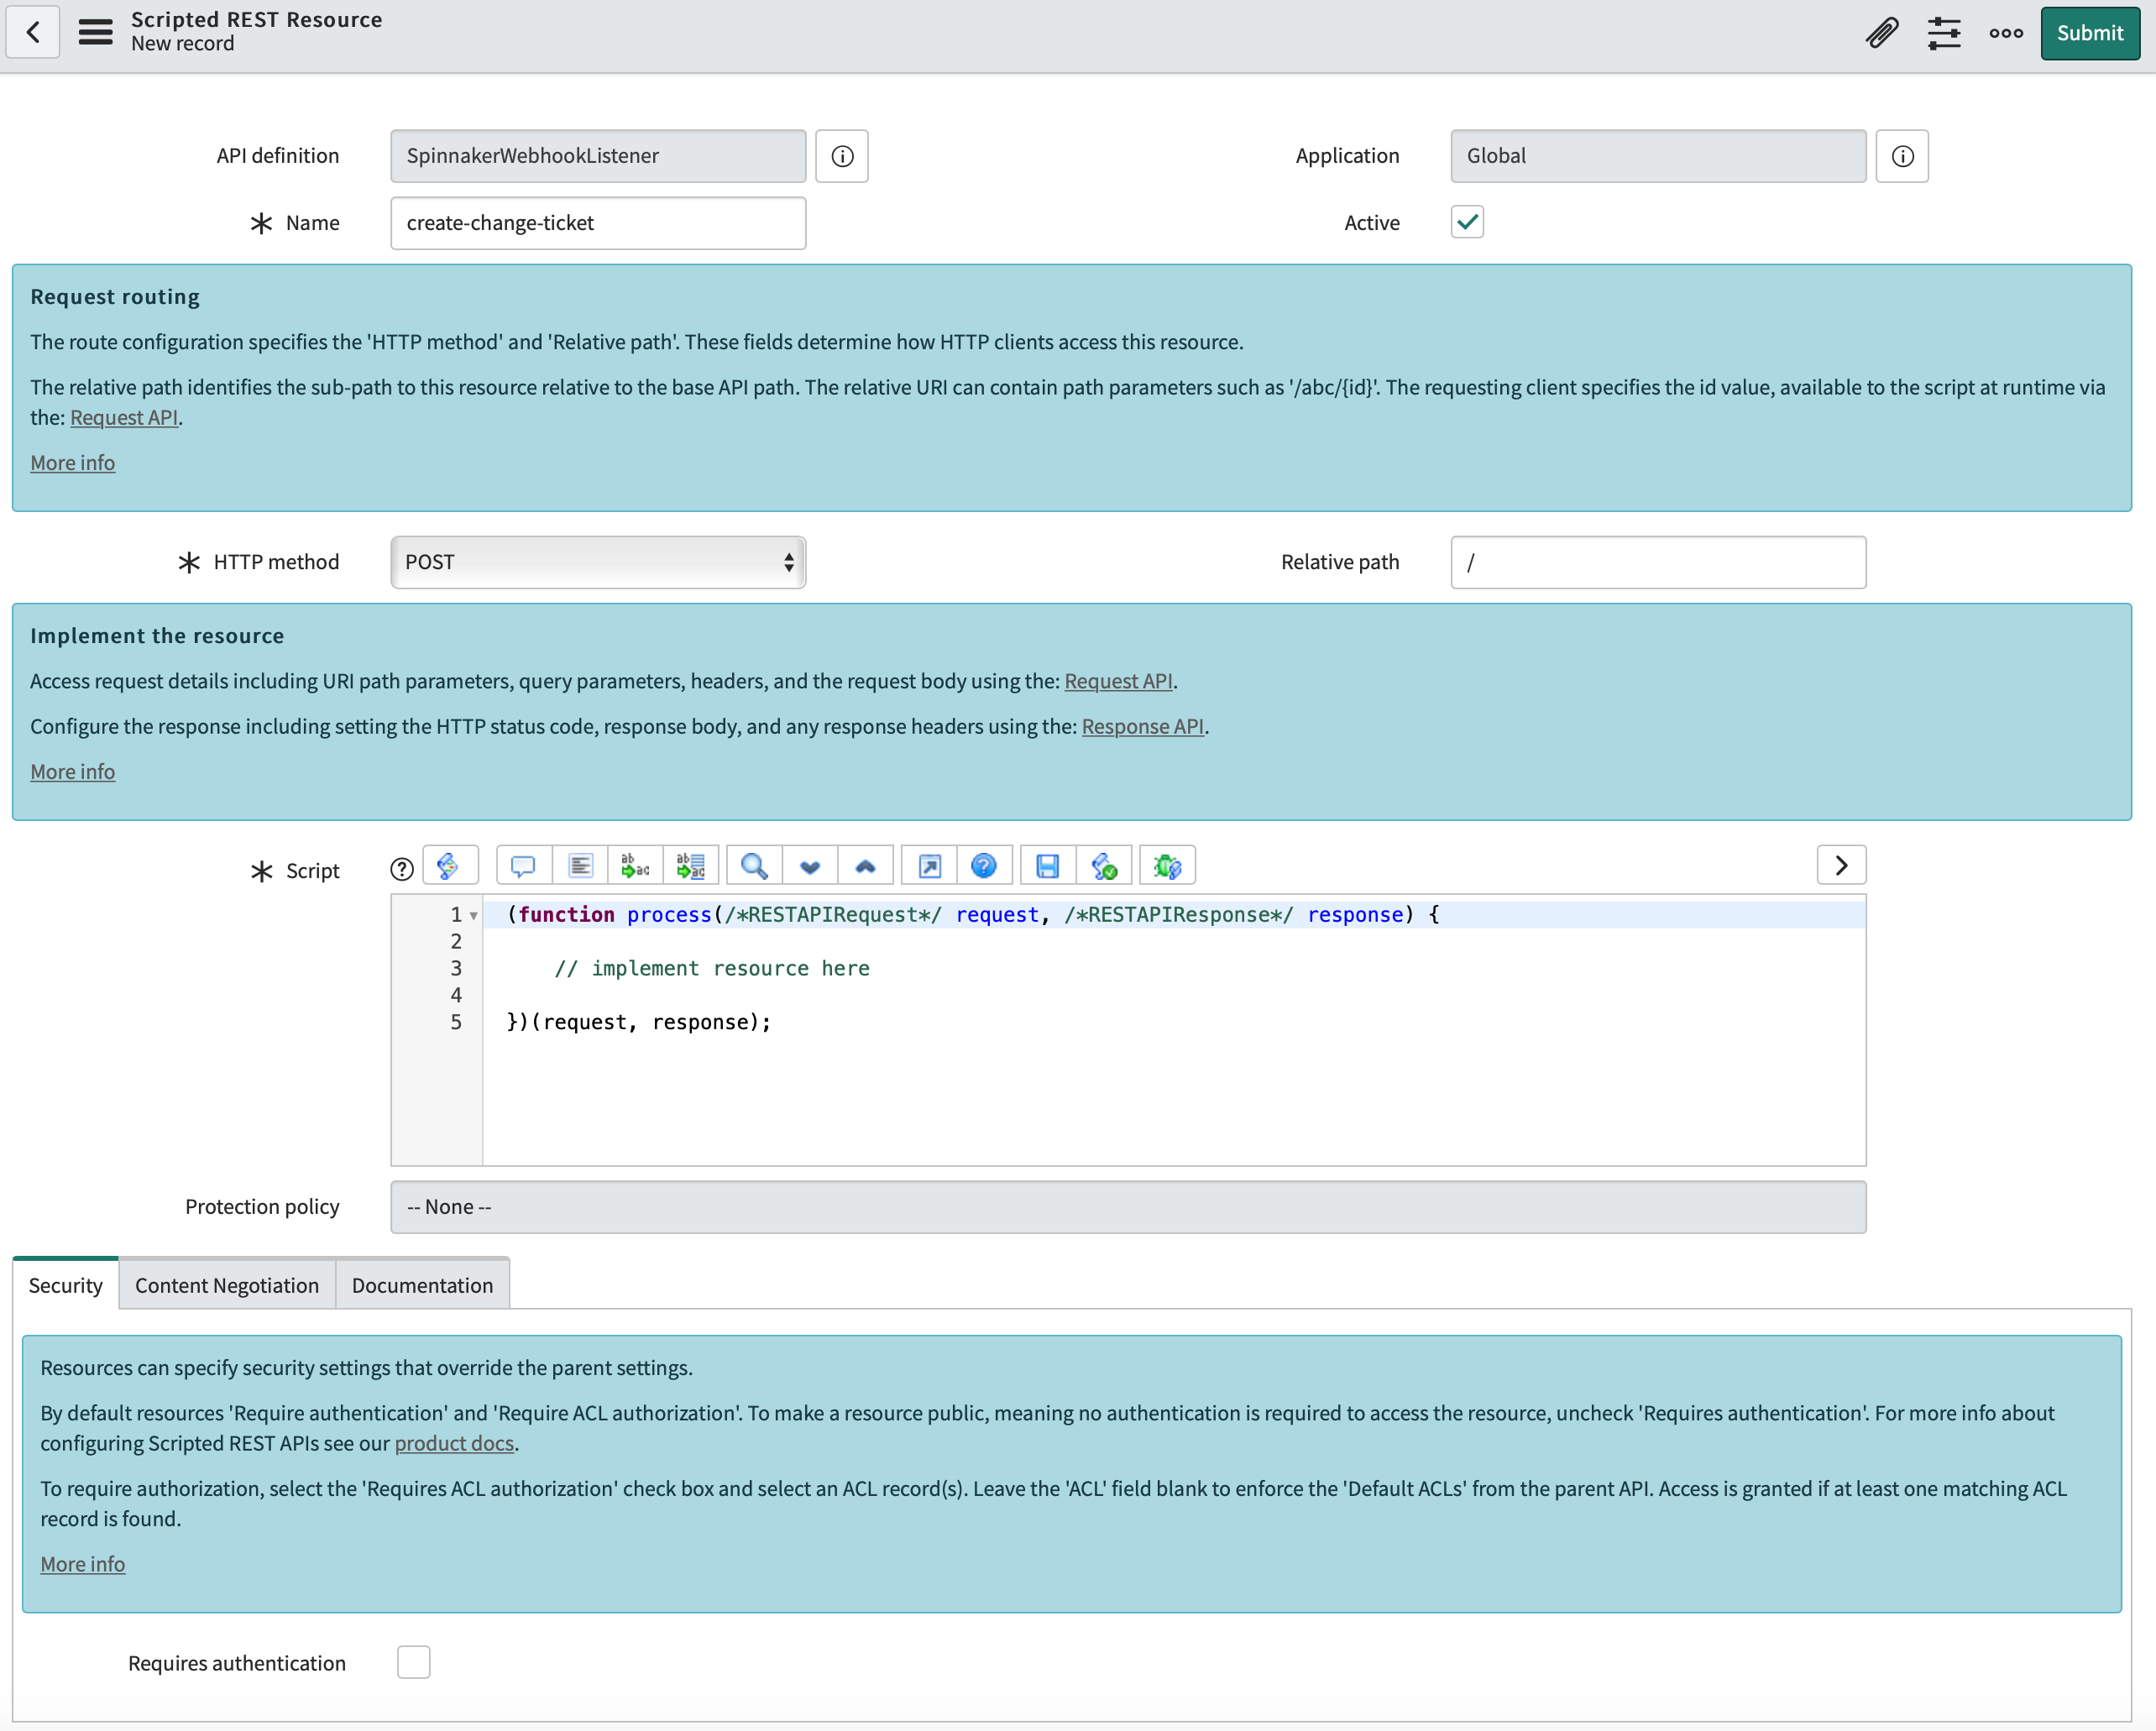
Set the HTTP method to POST.
If you are planning on having only one resource in the REST API, you can leave the Relative Path as is.
If you plan to create multiple Resources, set the relative path to be specific to this resource. This will be appended to the API Path. The resulting path is appended to your ServiceNow instance address, and that is the URL Spinnaker uses.
Note: For testing the integration, you can opt to not require authentication.
Optionally, provide the script. You can also provide one at a later time.
Example script
The following is an example script you can use when configuring ServiceNow:
(function process(/RESTAPIRequest/ request, /RESTAPIResponse/ response) {
// implement resource here
//gs.info(request.body.dataString);
response = request.body.dataString;
var gr = new GlideRecord('change_request');
gr.initialize();
var parser = new JSONParser();
var parsedData = parser.parse(response);
//gs.info(parsedData);
gs.info(parsedData.application);

gr.short_description = parsedData.application;
gr.description = parsedData.description;
//gr.change_request = current.sys_id;
gr.insert();
})(request, response);
Keep in mind that this only works if the webhook sends the proper data.
In the example script, the response object is the JSON payload from the webhook. Whenever you see ‘gs.info()’, it is how you can write to the ServiceNow System Log. Use this as a debug tool as it allows you to write to the log the values found in the payload. The example script expects at least two key-pair values in the JSON payload, one key being application and the other description. In this example, the value for the application key is being set to the Short Description of the Change. The value associated with the description key goes in the Description field.
ServiceNow REST API
ServiceNow also has a REST API. You can use ServiceNow’s REST API Explorer to view sample code for any REST API call, including creating a change request.
ServiceNow Workflows
While most people are familiar with ServiceNow as a ‘ticketing system’, it also has an automation engine. RunBooks for this engine are created as workflows. These workflows can automate internal ServiceNow operations (like handling approval routing) as well as calling other systems APIs (called Orchestrations), like provisioning VMs on-premise or in the cloud.
These workflows can be called from a ServiceNow script in a Scripted REST API.
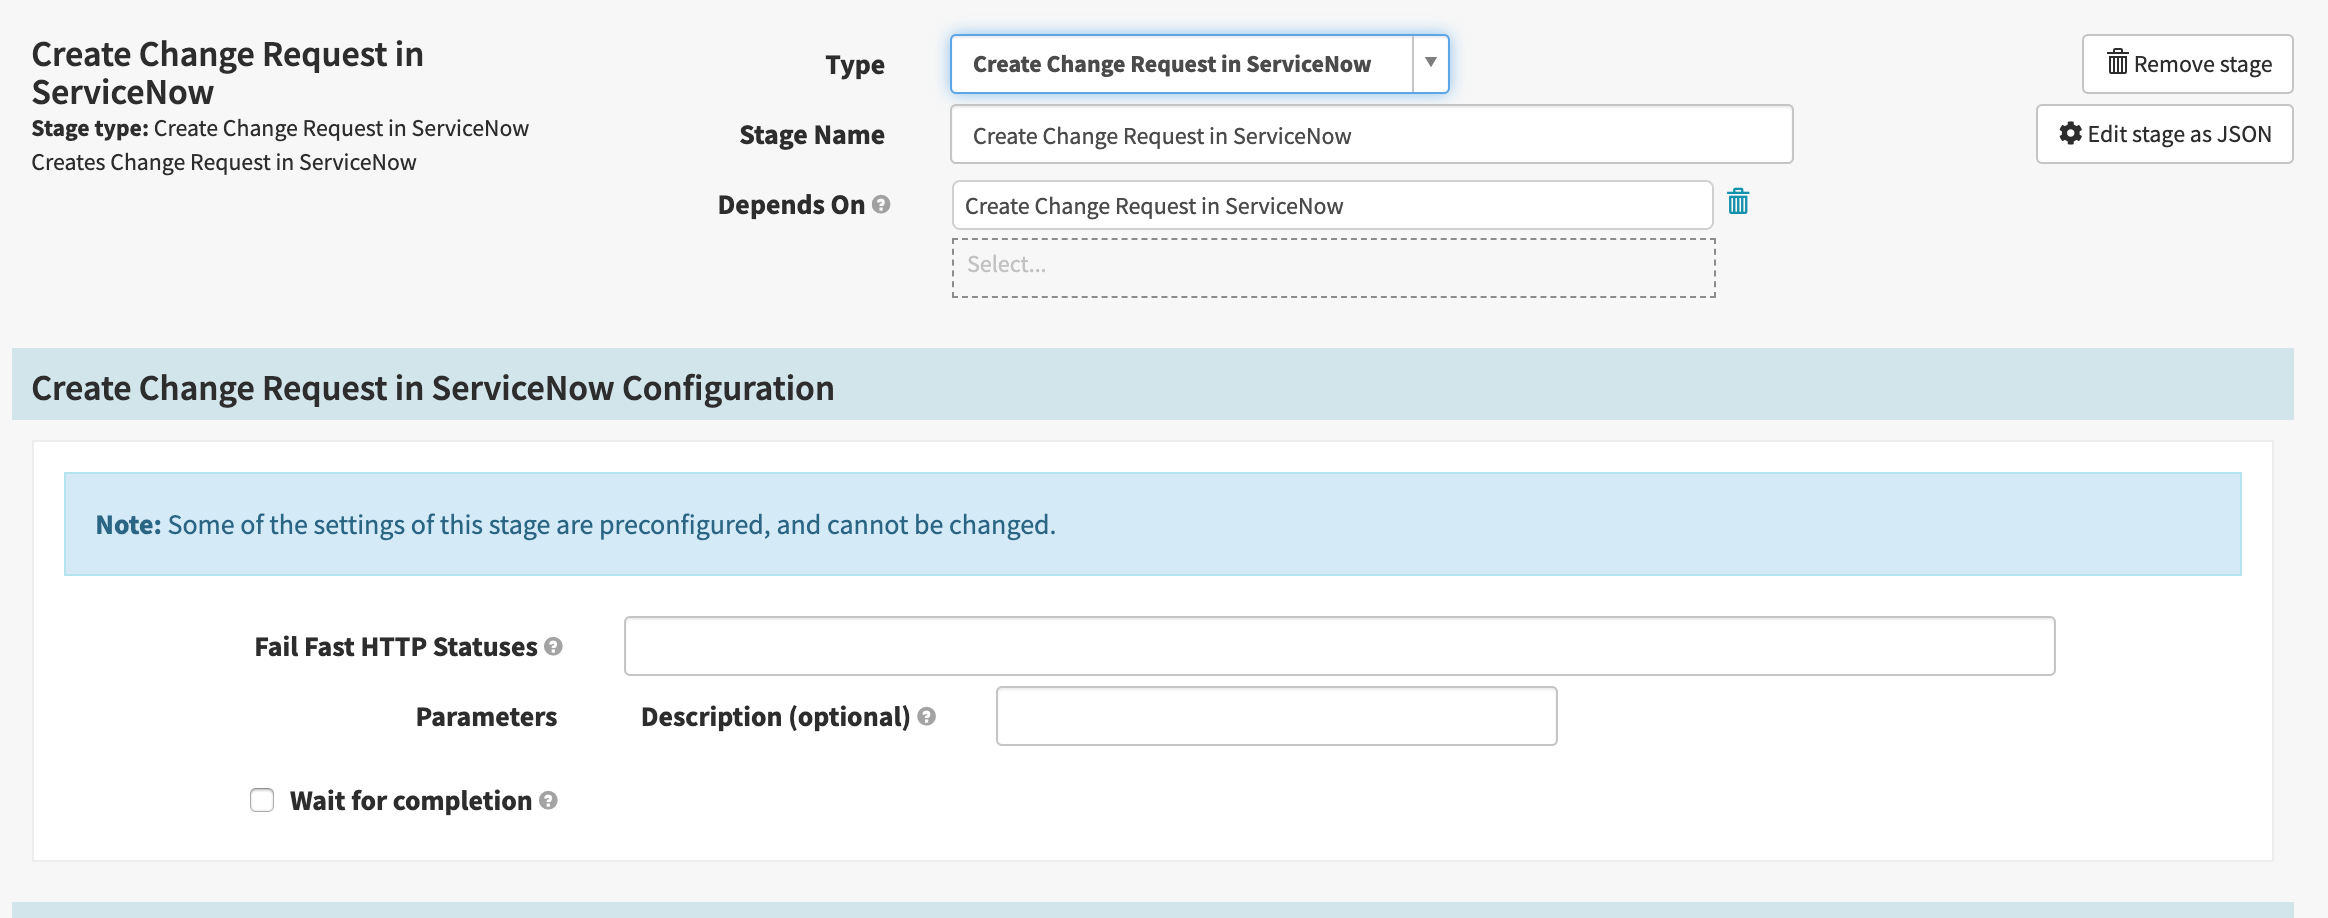
Setting Up the Webhook Stage in Spinnaker
The next step is to either create a generic webhook stage or a custom stage.
To create a custom stage, perform the following steps:
In
/home/spinnaker/.hal/default/profileson your Halyad pod, editorca-local. If the file does not exist, create it. Below are the contents of my orca-local.yaml that generated my custom ServiceNow stage:webhook: preconfigured: - # stage name in stage selector drop down label: "Create Change Request in ServiceNow" enabled: true # UI description for stage description: Creates Change Request in ServiceNow # stage 'type' in stage definition type: createChangeSNOW # Webhook type method: POST # URL for webhook call url: https://dev102110.service-now.com/api/77303/spinnakerwebhooklistener customHeaders: # Any necessary headers (supports S3 / Vault) # Authorization: Basic c2VydmljZWFjY291bnQ6cGFzc3dvcmQK Content-Type: application/json # Payload for the request payload: |- { "application": "${trigger\['artifacts'\][0]['reference']}" "description": "${parameterValues['description']}" } # Zero or more parameters parameters: - label: Description (optional) name: description description: Enter a description for the ServiceNow Change Request type: stringNote that the example payload contains the two key/pair values that ServiceNow is expecting.
The application is going to be the artifact that is triggering the pipeline. In the example, the pipeline is triggered when a new version of a container for a given organization or application is pushed to the configured Docker Registry. Artifactory is configured as the Docker Registry, so the application is set to something that follows a similar format:
<jfrog server-reponame-jfrog.io/<orgname>/ <application>:<tag>.The above is an example of using Pipeline Expressions to pass dynamic values. The description is an example of passing values that the user can enter in the stage when it is configured.
Apply your changes to Spinnaker:
hal deploy apply.Once you apply your changes, open Deck, Spinnaker’s UI.
When you create or edit a pipeline, a new stage available is available:
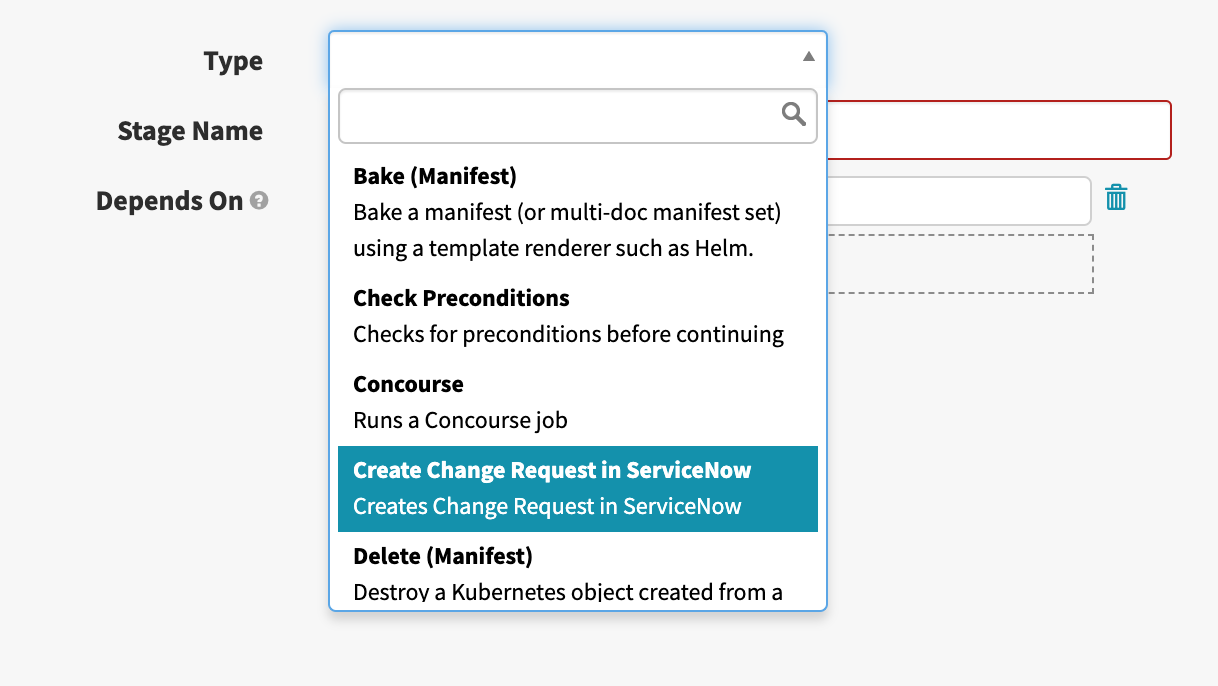
If the new stage does not appear, perform a hard refresh or clear your browser cache and reopen Deck.
Other Spinnaker users can use the ServiceNow stage you created.
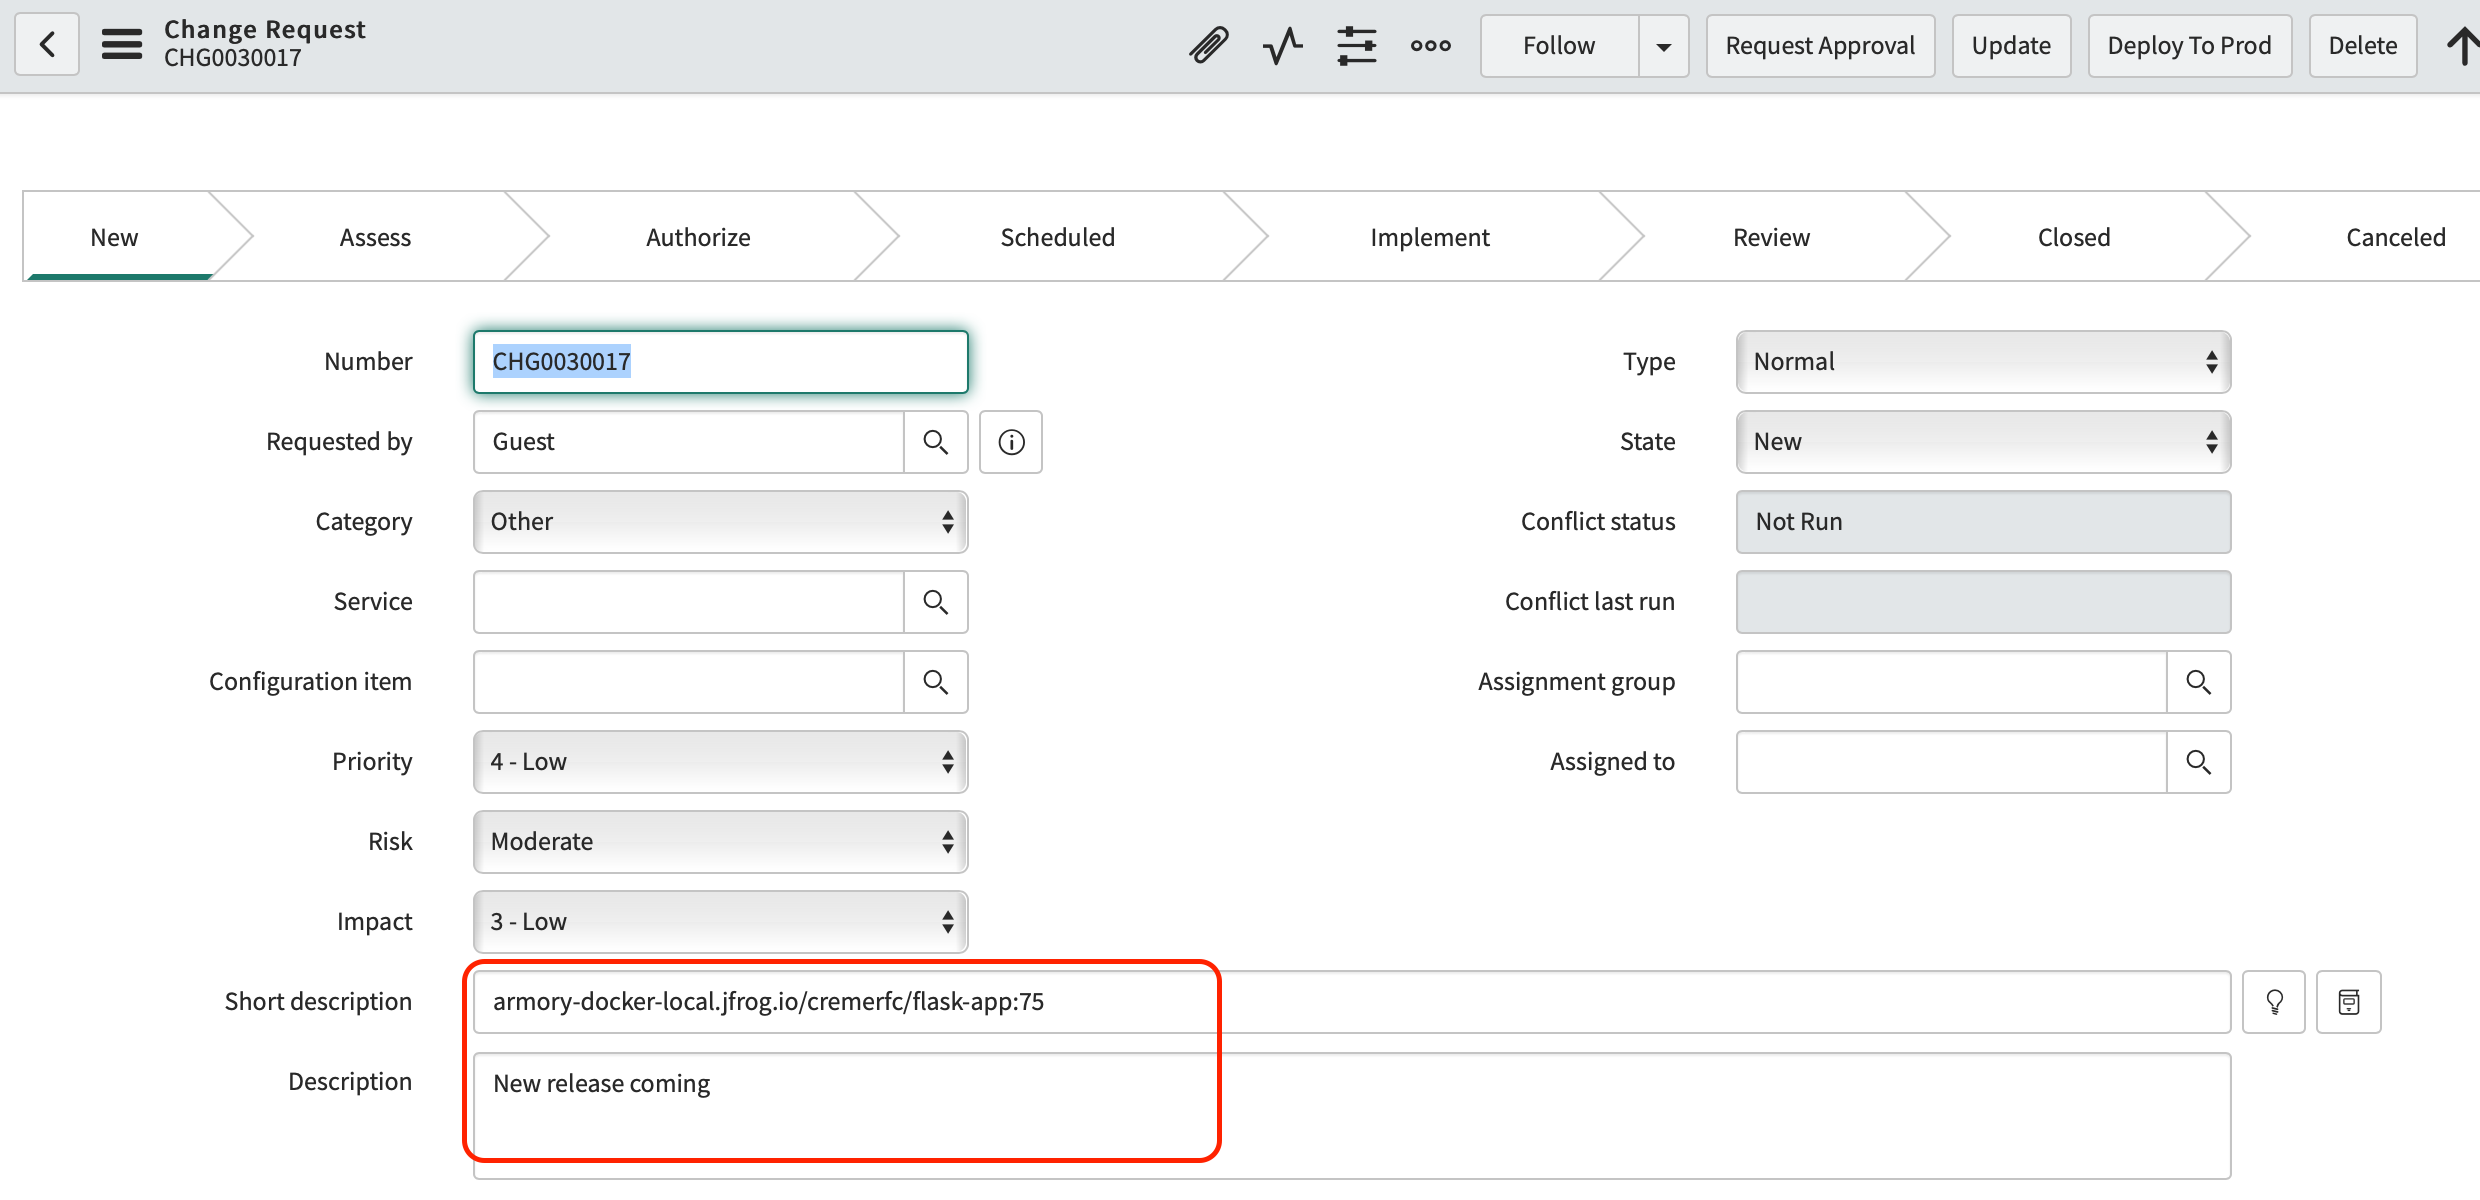
The following screenshot shows a Change Request in ServiceNow created by the custom webhook stage:
Triggering a pipeline based on webhooks
Another use case is to trigger a pipeline when a ticket gets approved. For many users, a deployment into production cannot happen unless there is an approval in ServiceNow.
At it’s simplest implementation, an approval can trigger a pipeline execution. A more complex implementation could take fields from the ticket being approved and passed them to the pipeline as parameters to guide the deployment.
The following screenshot shows a pipeline with that gets triggered based on a webhook:
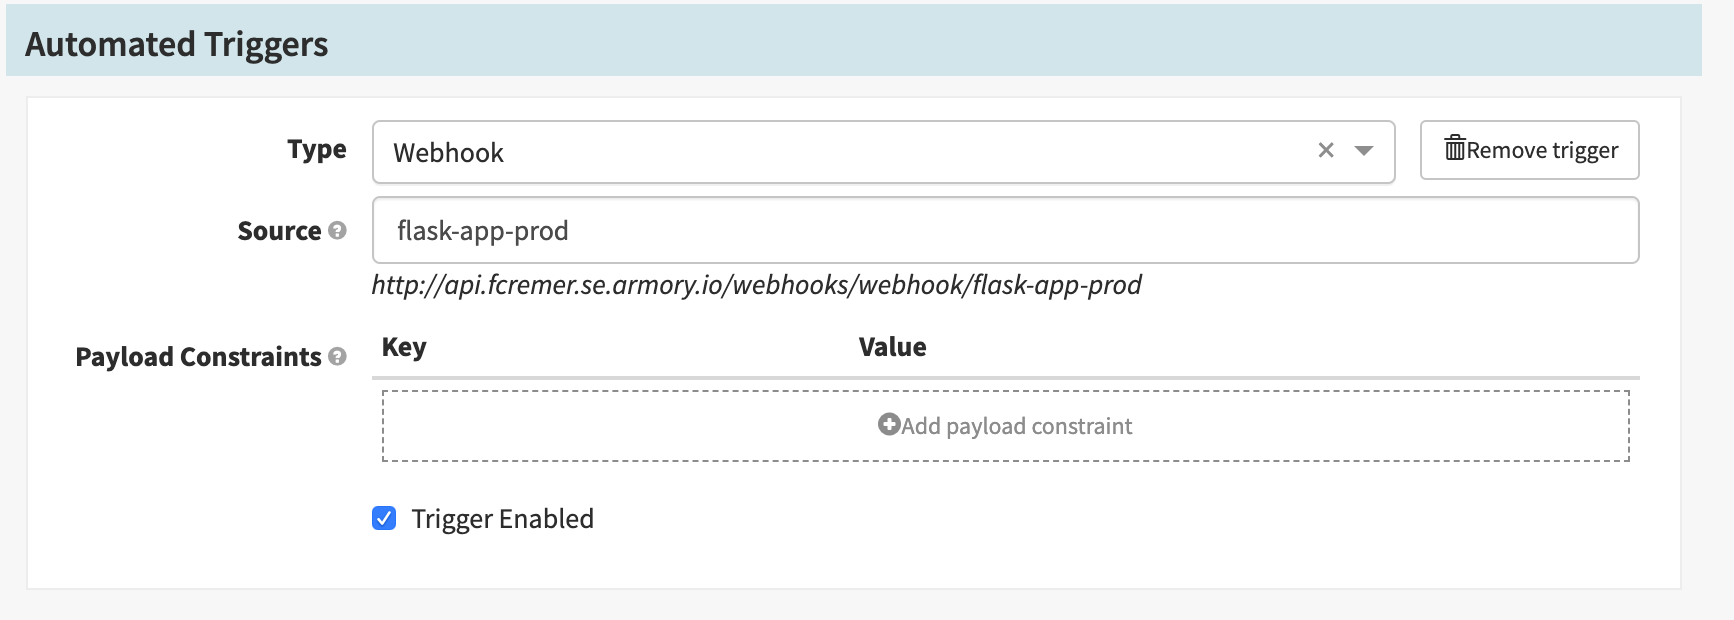
You can add payload constraints to avoid webhooks without the right payload from being processed. Armory recommends testing the webhook without contraints first.
On the ServiceNow side, you need something to call this URL. In the example environment, there is a button on the Change Request form in ServiceNow that calls the URL.
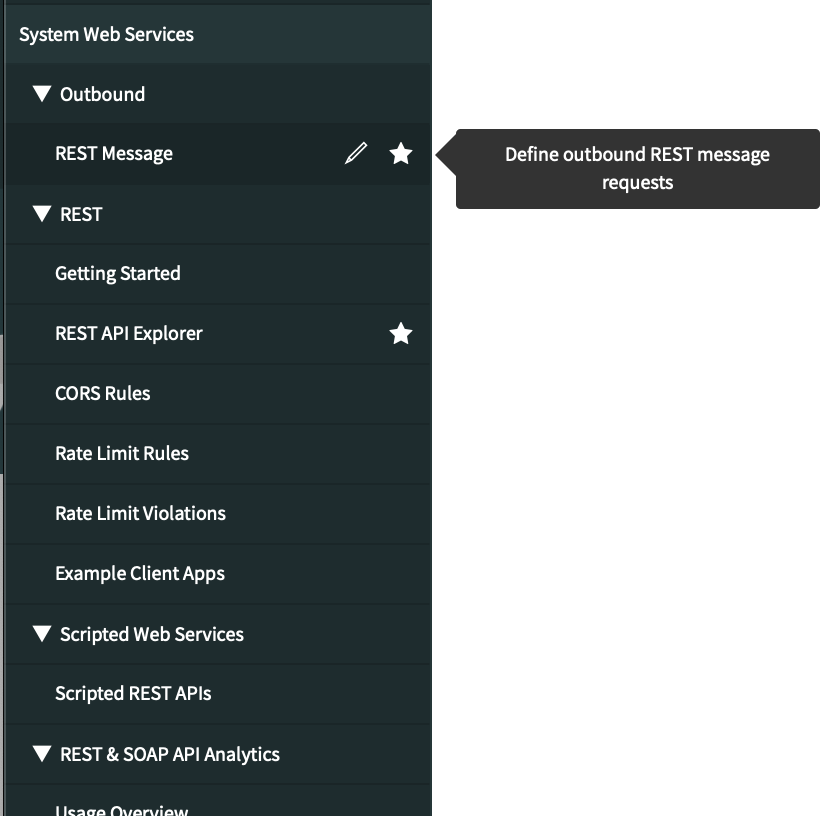
The first step is to define the REST call you need to make. To do this, type ‘REST’ on the navigation filter box and, from the results, select System Web Services > Outbound > REST Message:
Note: On the menu shown above, select REST API Explorer to get code samples on how to use the ServiceNow REST API to create, search, or edit objects in ServiceNow.
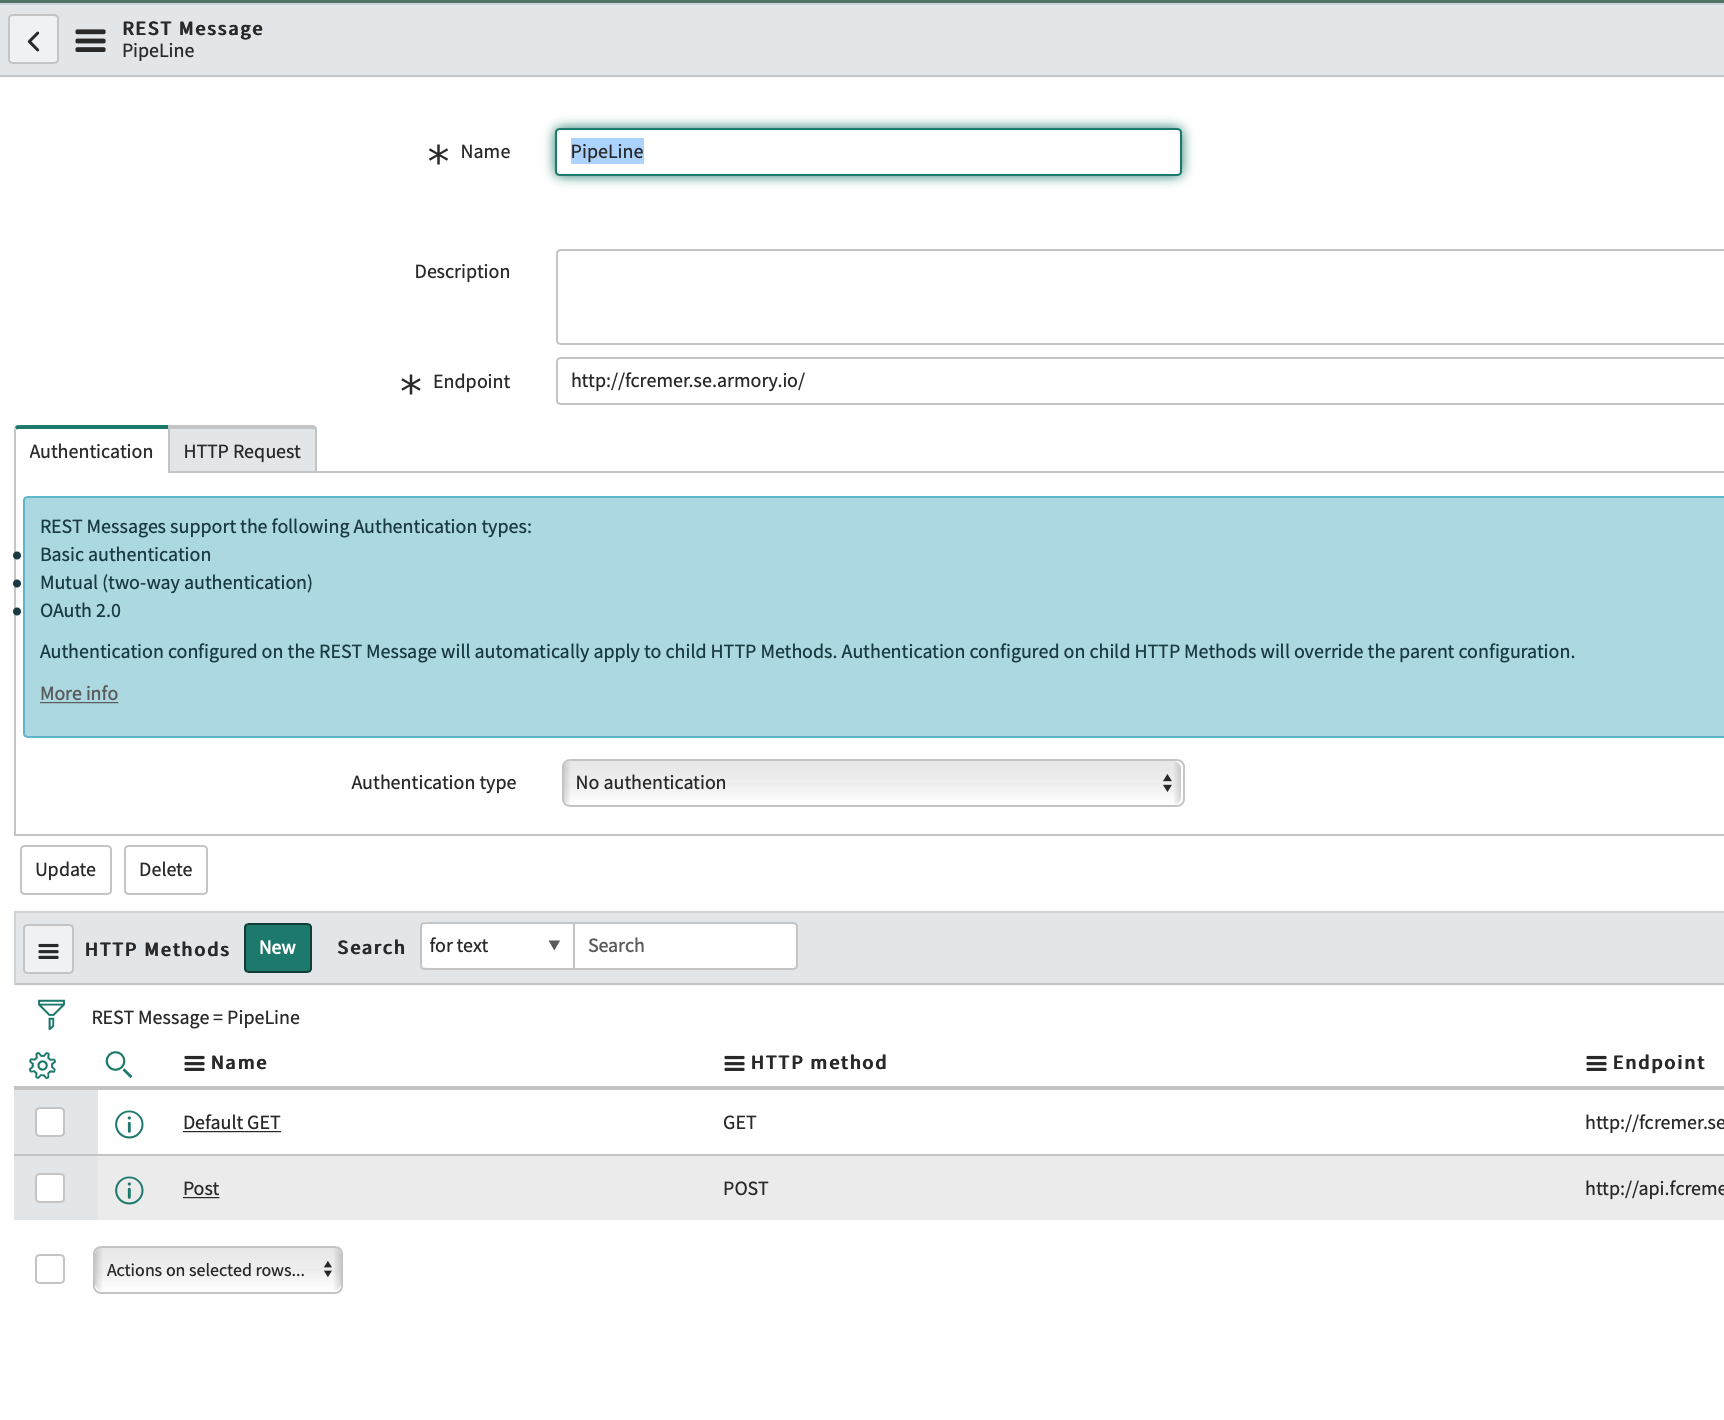
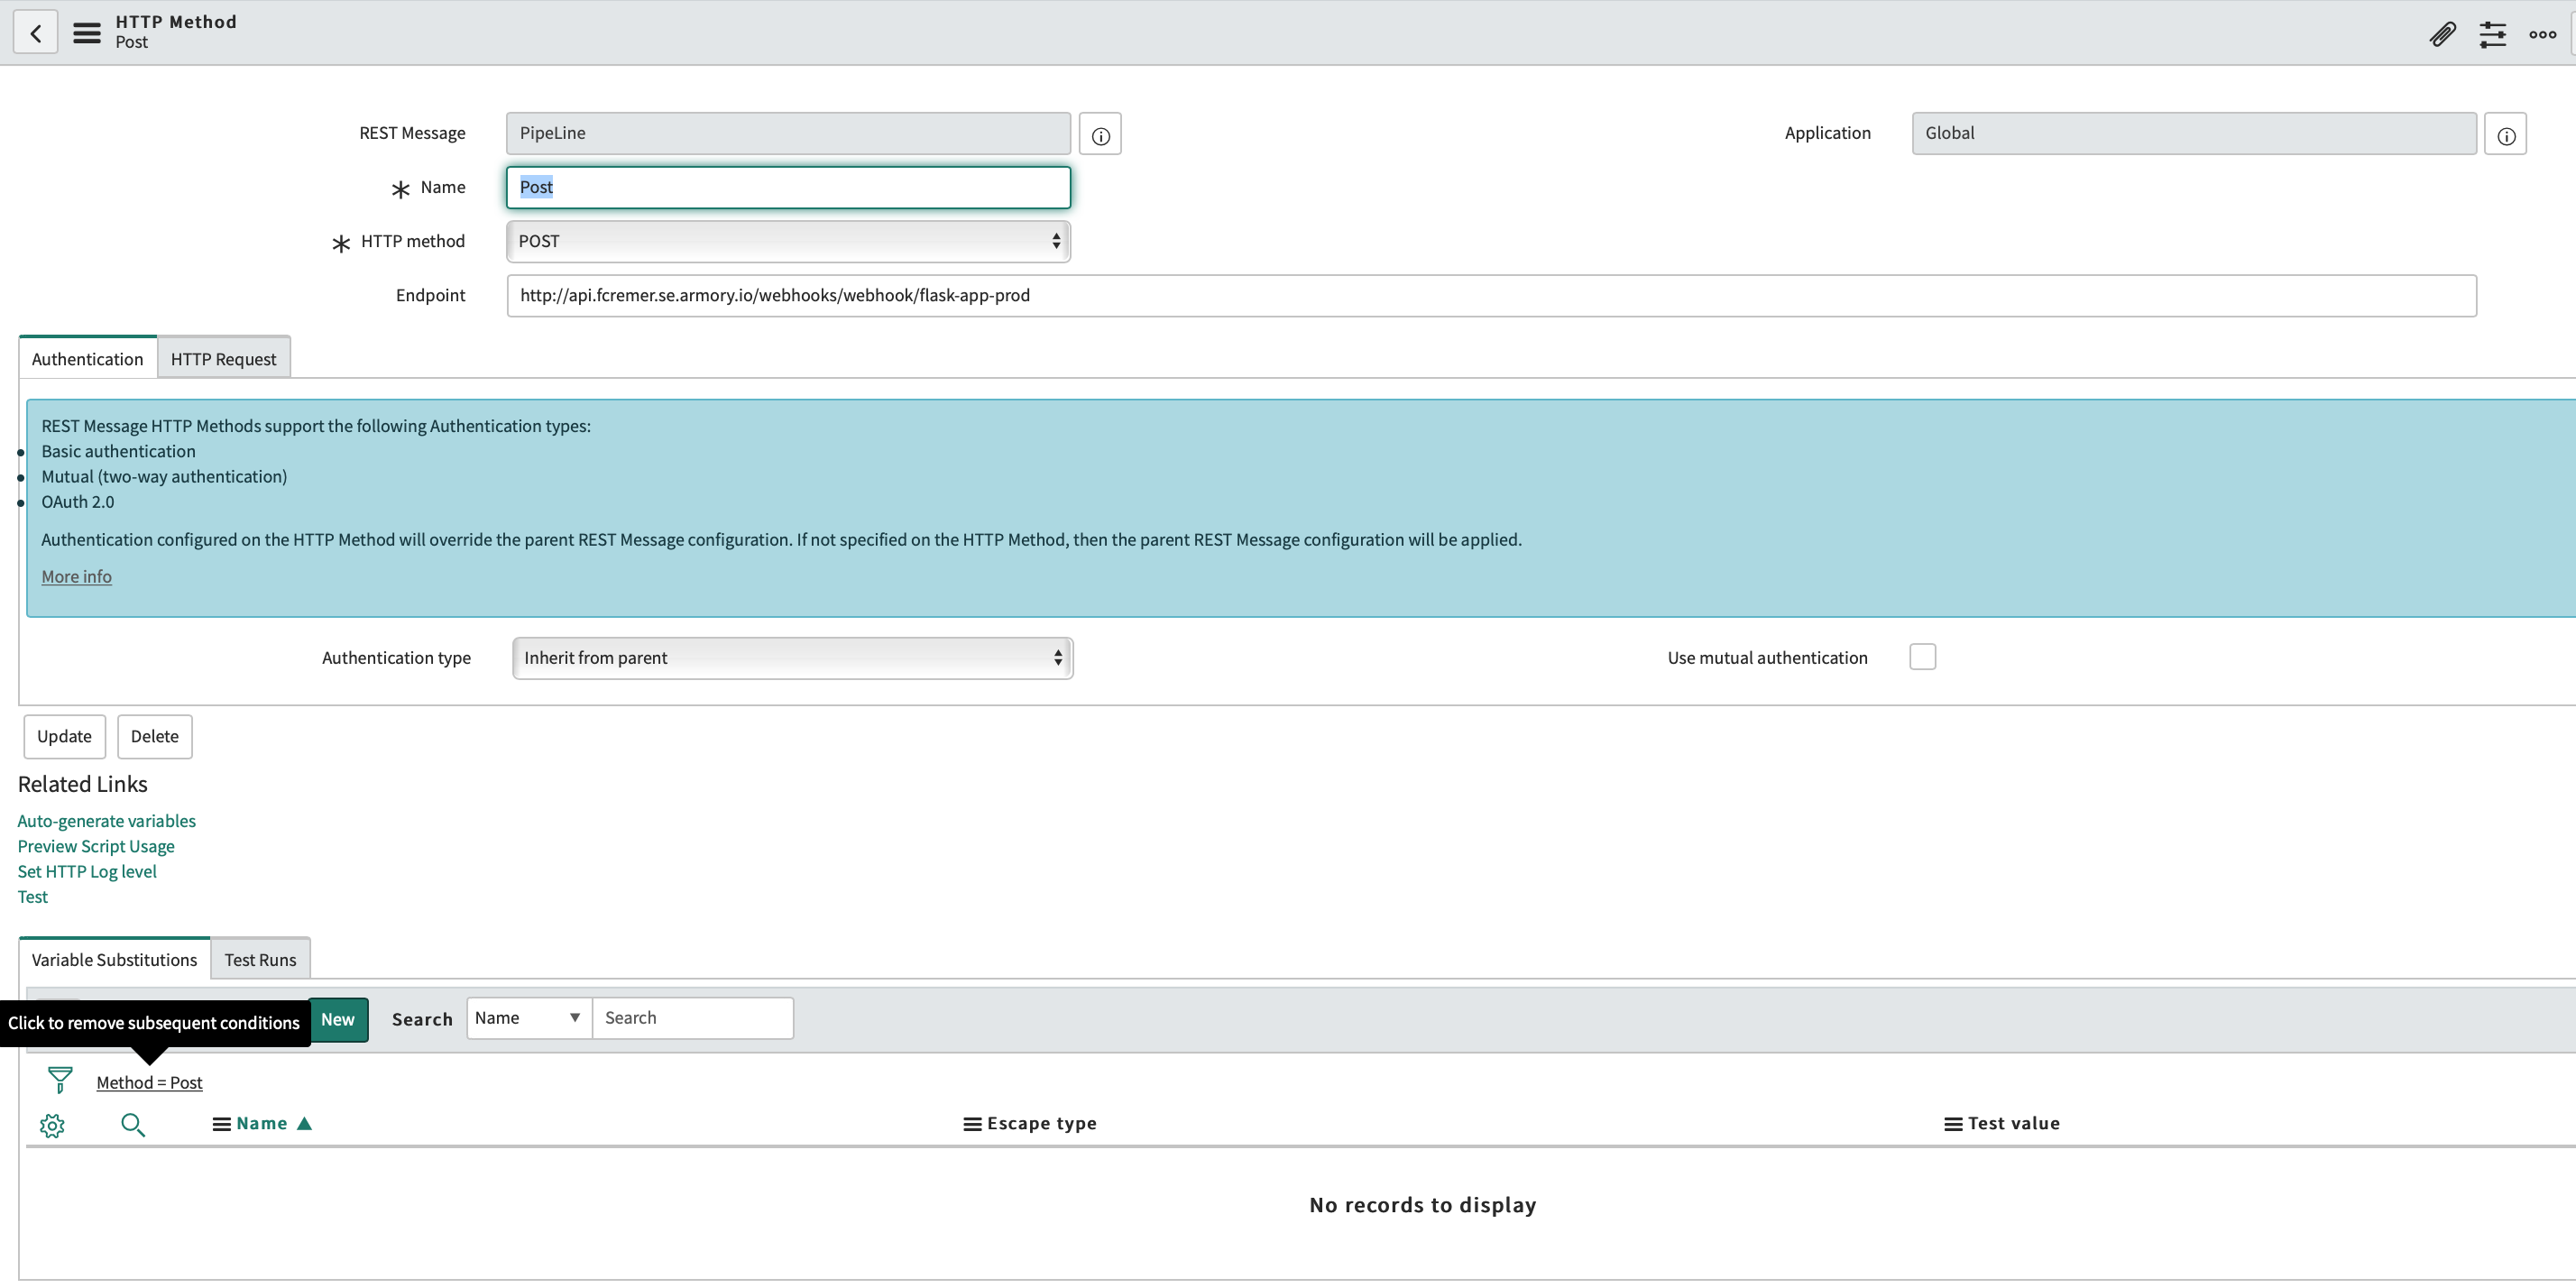
In the REST Messages window, create a new REST Message. The following image shows an example to trigger the pipeline.
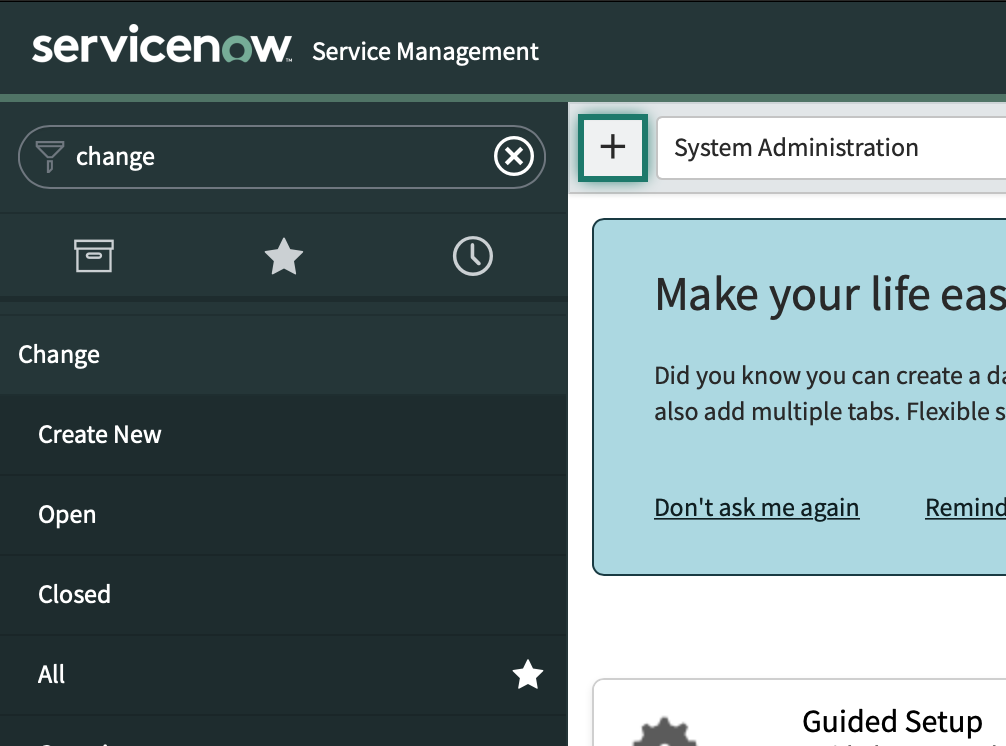
Once you have the REST Message set up, configure something to call it. Examples include when a ticket transitions as a step in a workflow or orchestration or a button or link on a form. This example uses a button in the form. Type “change” in the navigation filter as shown in the following image:
Click on Change > Open to get a list of all open Change Requests. Open any of Change Request from the list and right click on the top of the form as shown below to select Configure > UI Actions:
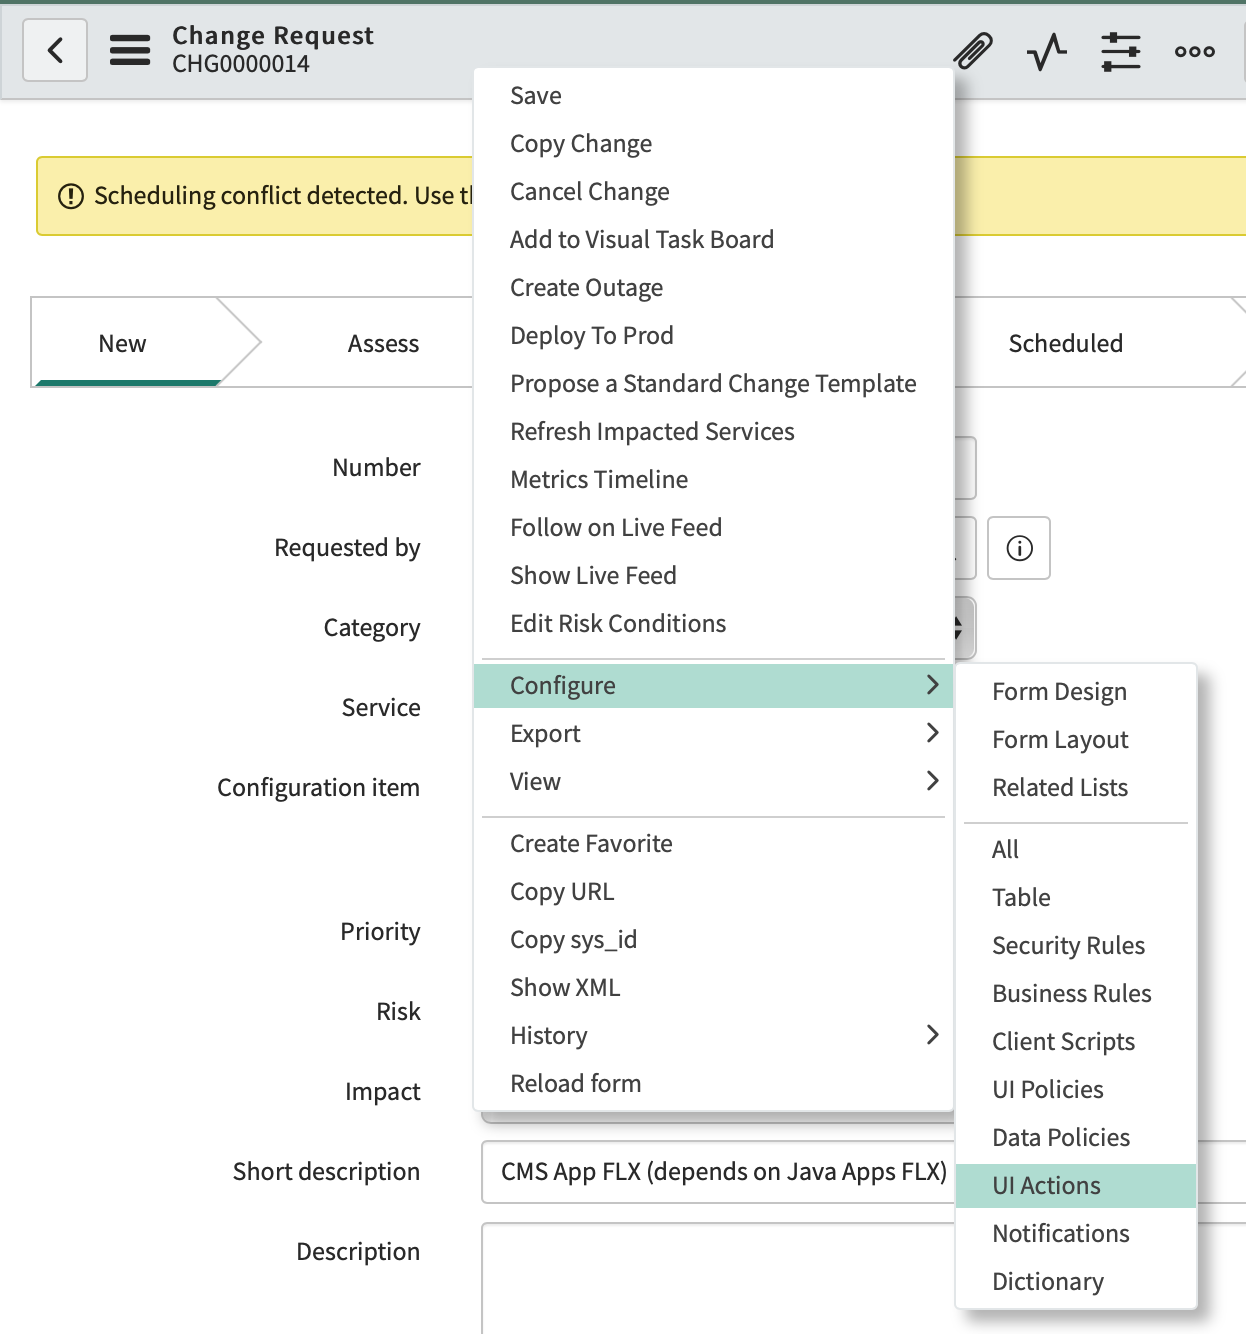
The following screenshot shows how a UI action can be configured:
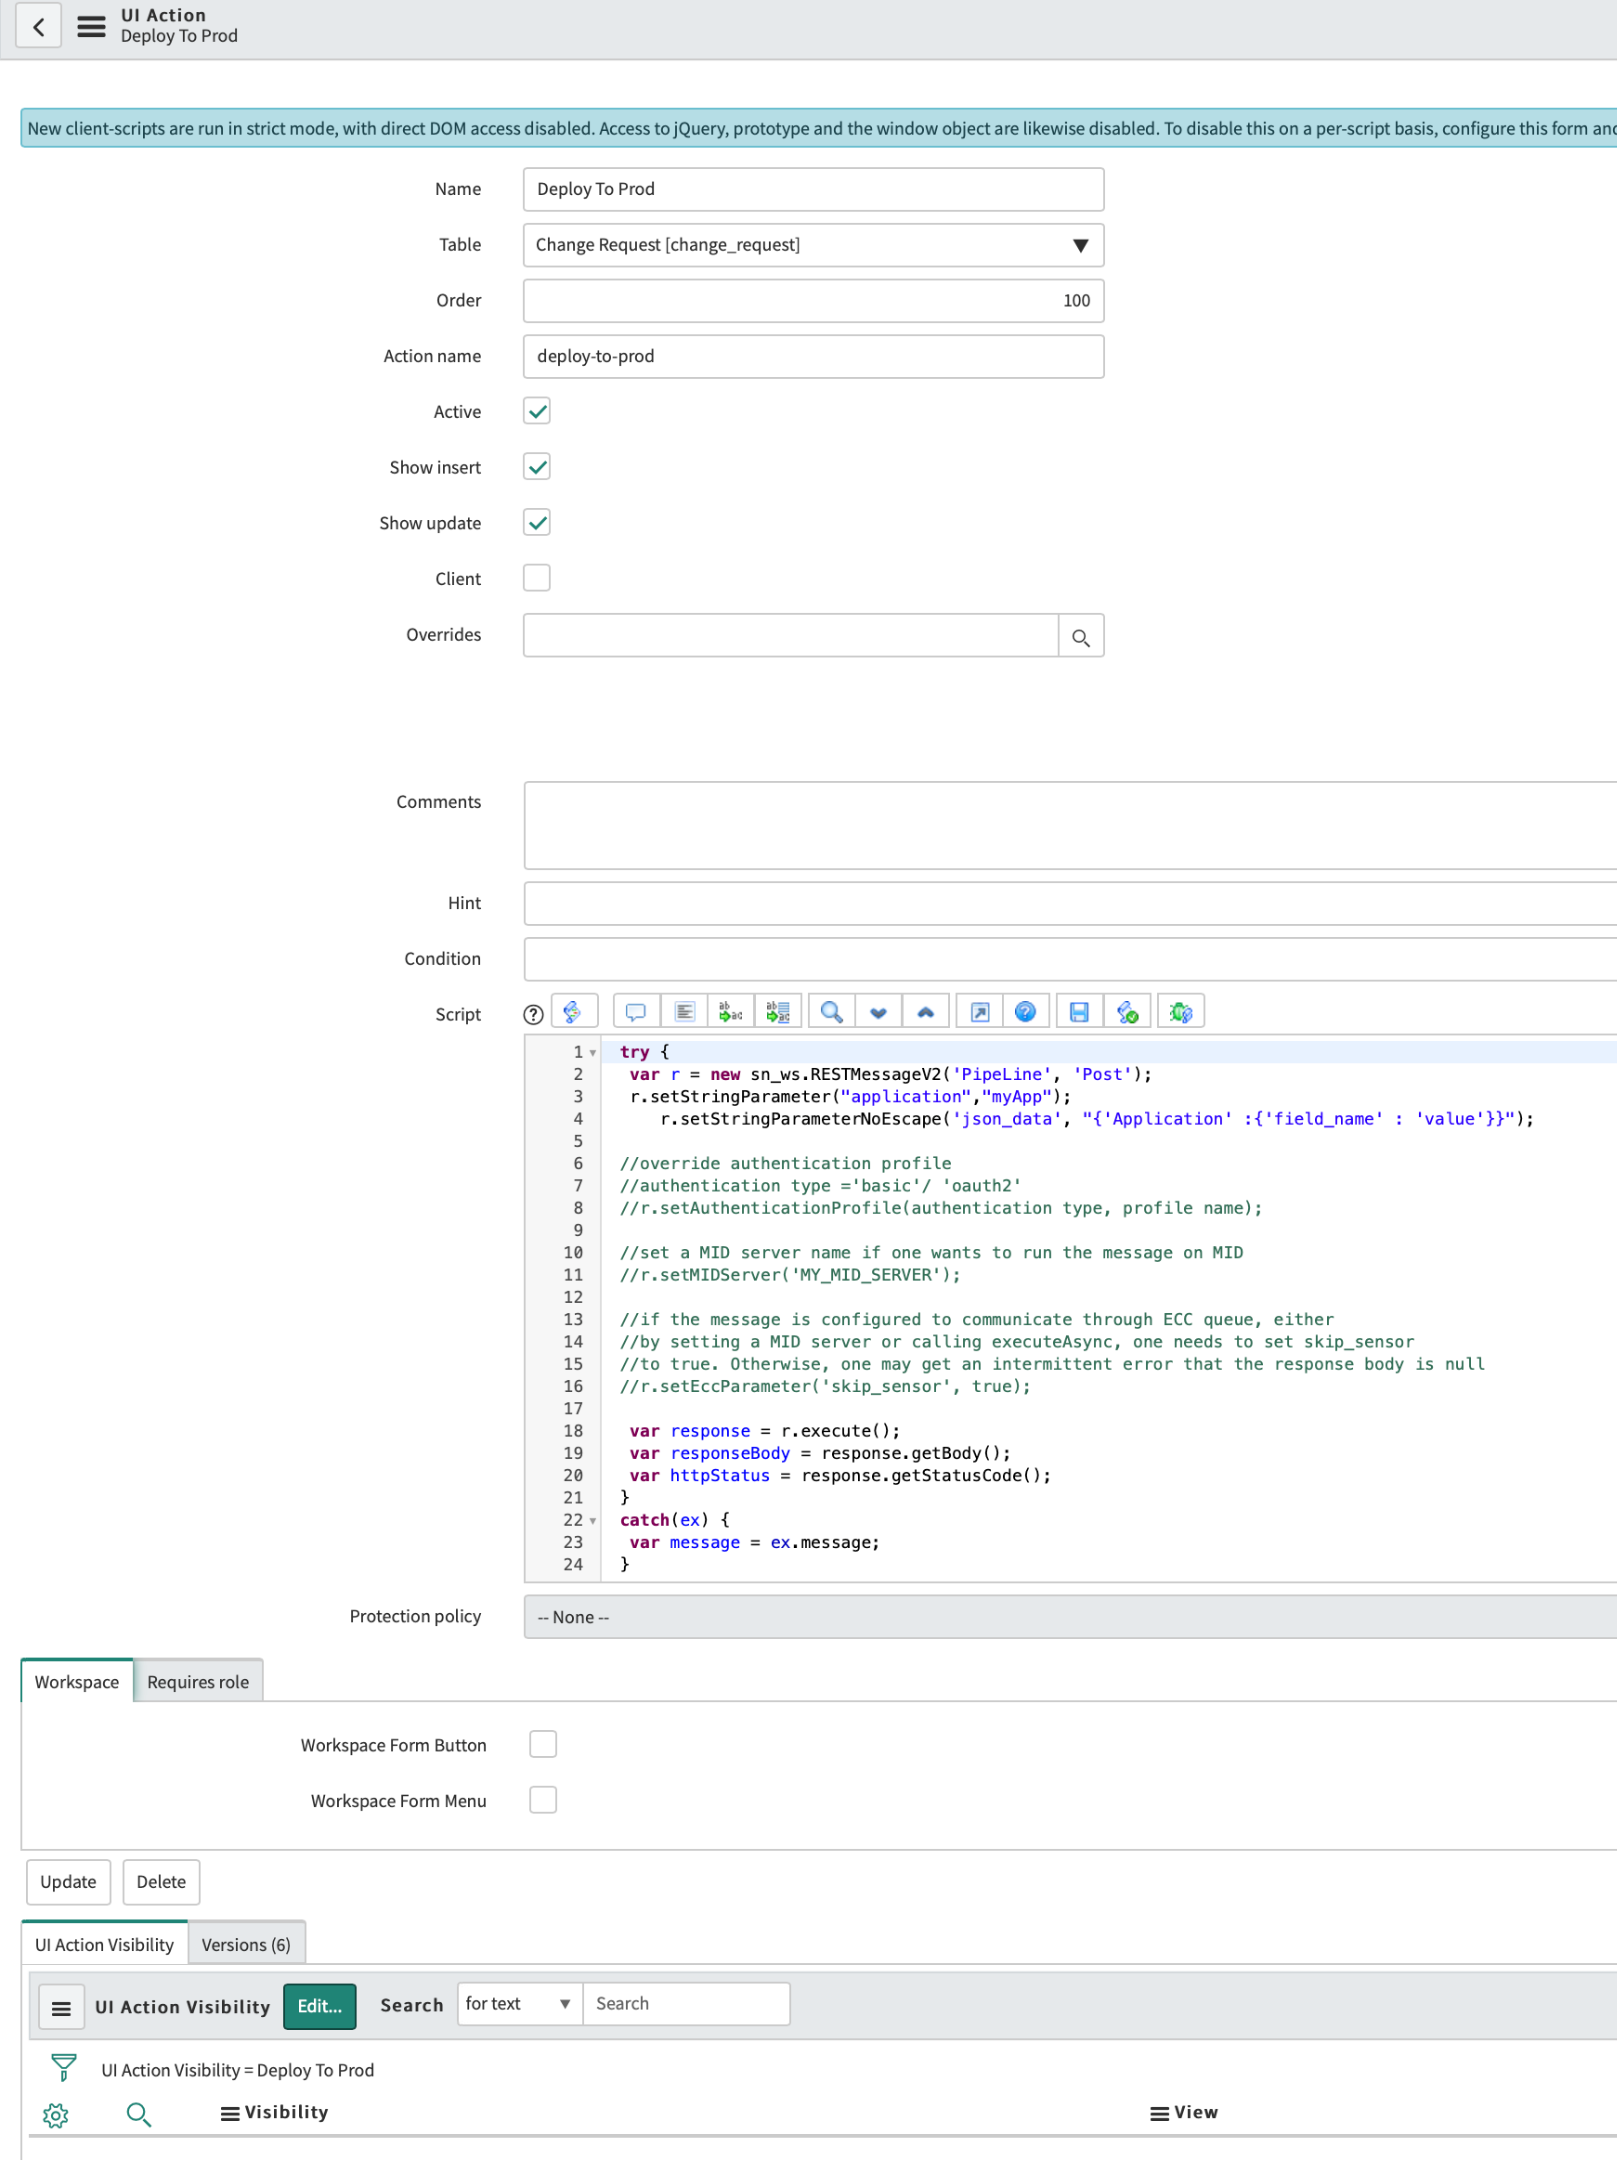
Note that you can use the Condition field to determine under which conditions the button should be active, such as when the status is “Ready for Approval”.
Feedback
Was this page helpful?
Thank you for letting us know!
Sorry to hear that. Please tell us how we can improve.
Last modified October 17, 2023: (aa87b671)