Install and Use the AWS CloudWatch Integration Plugin in Spinnaker
Before you begin
You should enable canary analysis support and be familiar with using canary analysis in Spinnaker. See the following Spinnaker Docs guides:
- Set up Canary Analysis Support (Halyard)
- Canary Overview
- Configure a canary
- Add a canary stage to a pipeline
Enable AWS CloudWatch as a metrics store
To enable AWS CloudWatch, update the AWS configuration entry in your kayenta-local.yml file. Make sure METRICS_STORE is listed under supportedTypes. Add the cloudwatch entry with enabled: true.
This example uses S3 as the object store and CloudWatch as the metrics store.
kayenta:
  aws:
    enabled: true
    accounts:
      - name: monitoring
        bucket: <your-s3-bucket>
        region: <your-region>
        # Kayenta can assume a role when connecting to Cloudwatch using the iamRole configs
        # iamRoleArn: <your-role-ARN> # For example arn:aws:iam::042225624470:role/theRole
        # iamRoleExternalId: Optional. For example 12345
        # iamRoleArnTarget: <your-role-ARN-target> # For example arn:aws:iam::042225624470:role/targetcloudwatchaccount
        # iamRoleExternalIdTarget: <your-ExternalID> # Optional. For example 84475
        rootFolder: kayenta
        roleName: default
        supportedTypes:
          - OBJECT_STORE
          - CONFIGURATION_STORE
          - METRICS_STORE
  cloudwatch:
    enabled: true
  s3:
    enabled: true
Install the plugin in Spinnaker
Add a Kustomize patch with the following contents:
spec:
  spinnakerConfig:
    profiles:
      kayenta:
        spinnaker:
          extensibility:
            plugins:
              Armory.CloudWatch:
                enabled: true
                version: <version>
            repositories:
              cloudwatch:
                enabled: true
                url: https://raw.githubusercontent.com/armory-plugins/pluginRepository/master/repositories.json
        kayenta:
          aws:
            enabled: true
            accounts:
          cloudwatch:
            enabled: true
- Replace
<version>with the plugin version that’s compatible with your Spinnaker version. - Add the patch to the
patchesStrategicMergesection of your kustomization file. - Apply your update.
Show an example with CloudWatch Configured
spec:
  spinnakerConfig:
    profiles:
      kayenta:
        spinnaker:
          extensibility:
            plugins:
              Armory.CloudWatch:
                enabled: true
                version: 0.1.0
            repositories:
              cloudwatch:
                enabled: true
                url: https://raw.githubusercontent.com/armory-plugins/pluginRepository/master/repositories.json
        kayenta:
          aws:
            enabled: true
            accounts:
              - name: monitoring
                bucket: <your-s3-bucket>
                region: <your-region>
                # Kayenta can assume a role when connecting to Cloudwatch using the iamRole configs
                # iamRoleArn: <your-role-ARN> # For example arn:aws:iam::042225624470:role/theRole
                # iamRoleExternalId: Optional. For example 12345
                # iamRoleArnTarget: <your-role-ARN-target> # For example arn:aws:iam::042225624470:role/targetcloudwatchaccount
                # iamRoleExternalIdTarget: <your-ExternalID> # Optional. For example 84475
                rootFolder: kayenta
                roleName: default
                supportedTypes:
                  - OBJECT_STORE
                  - CONFIGURATION_STORE
                  - METRICS_STORE
          cloudwatch:
            enabled: true
          s3:
            enabled: true
Alternately, add the plugin configuration in the spec.spinnakerConfig.profiles.kayenta section of your spinnakerservice.yml and then apply your update.
When Halyard adds a plugin to a Spinnaker installation, it adds the plugin repository information to all services, not just the ones the plugin is for. This means that when you restart Spinnaker, each service restarts, downloads the plugin, and checks if an extension exists for that service. Each service restarting is not ideal for large Spinnaker installations due to service restart times. To avoid every Spinnaker service restarting and downloading the plugin, do not add the plugin using Halyard.
The AWS CloudWatch Metrics Plugin extends Kayenta. You should create or update the extended service’s local profile in the same directory as the other Halyard configuration files. This is usually ~/.hal/default/profiles on the machine where Halyard is running.
Add the following to your kayenta-local.yml file:
spinnaker:
  extensibility:
    plugins:
      Armory.CloudWatch:
        enabled: true
        version: <version>
    repositories:
      cloudwatch:
        enabled: true
        url: https://raw.githubusercontent.com/armory-plugins/pluginRepository/master/repositories.json
kayenta:
  aws:
    enabled: true
    accounts:
  cloudwatch:
    enabled: true
- Replace
<version>with the plugin version that’s compatible with your Spinnaker version. - Enable AWS CloudWatch as a metric store.
hal deploy applyyour update.
Show an example with CloudWatch Configured
spinnaker:
  extensibility:
    plugins:
      Armory.CloudWatch:
        enabled: true
        version: 0.1.0
    repositories:
      cloudwatch:
        enabled: true
        url: https://raw.githubusercontent.com/armory-plugins/pluginRepository/master/repositories.json
kayenta:
  aws:
    enabled: true
    accounts:
      - name: monitoring
        bucket: <your-s3-bucket>
        region: <your-region>
        # Kayenta can assume a role when connecting to Cloudwatch using the iamRole configs
        # iamRoleArn: <your-role-ARN> # For example arn:aws:iam::042225624470:role/theRole
        # iamRoleExternalId: Optional. For example 12345
        # iamRoleArnTarget: <your-role-ARN-target> # For example arn:aws:iam::042225624470:role/targetcloudwatchaccount
        # iamRoleExternalIdTarget: <your-ExternalID> # Optional. For example 84475
        rootFolder: kayenta
        roleName: default
        supportedTypes:
          - OBJECT_STORE
          - CONFIGURATION_STORE
          - METRICS_STORE
  cloudwatch:
    enabled: true
  s3:
    enabled: true
Use AWS CloudWatch
Create a canary config
In the UI, you need to create a new canary config for the metrics you are interested in.
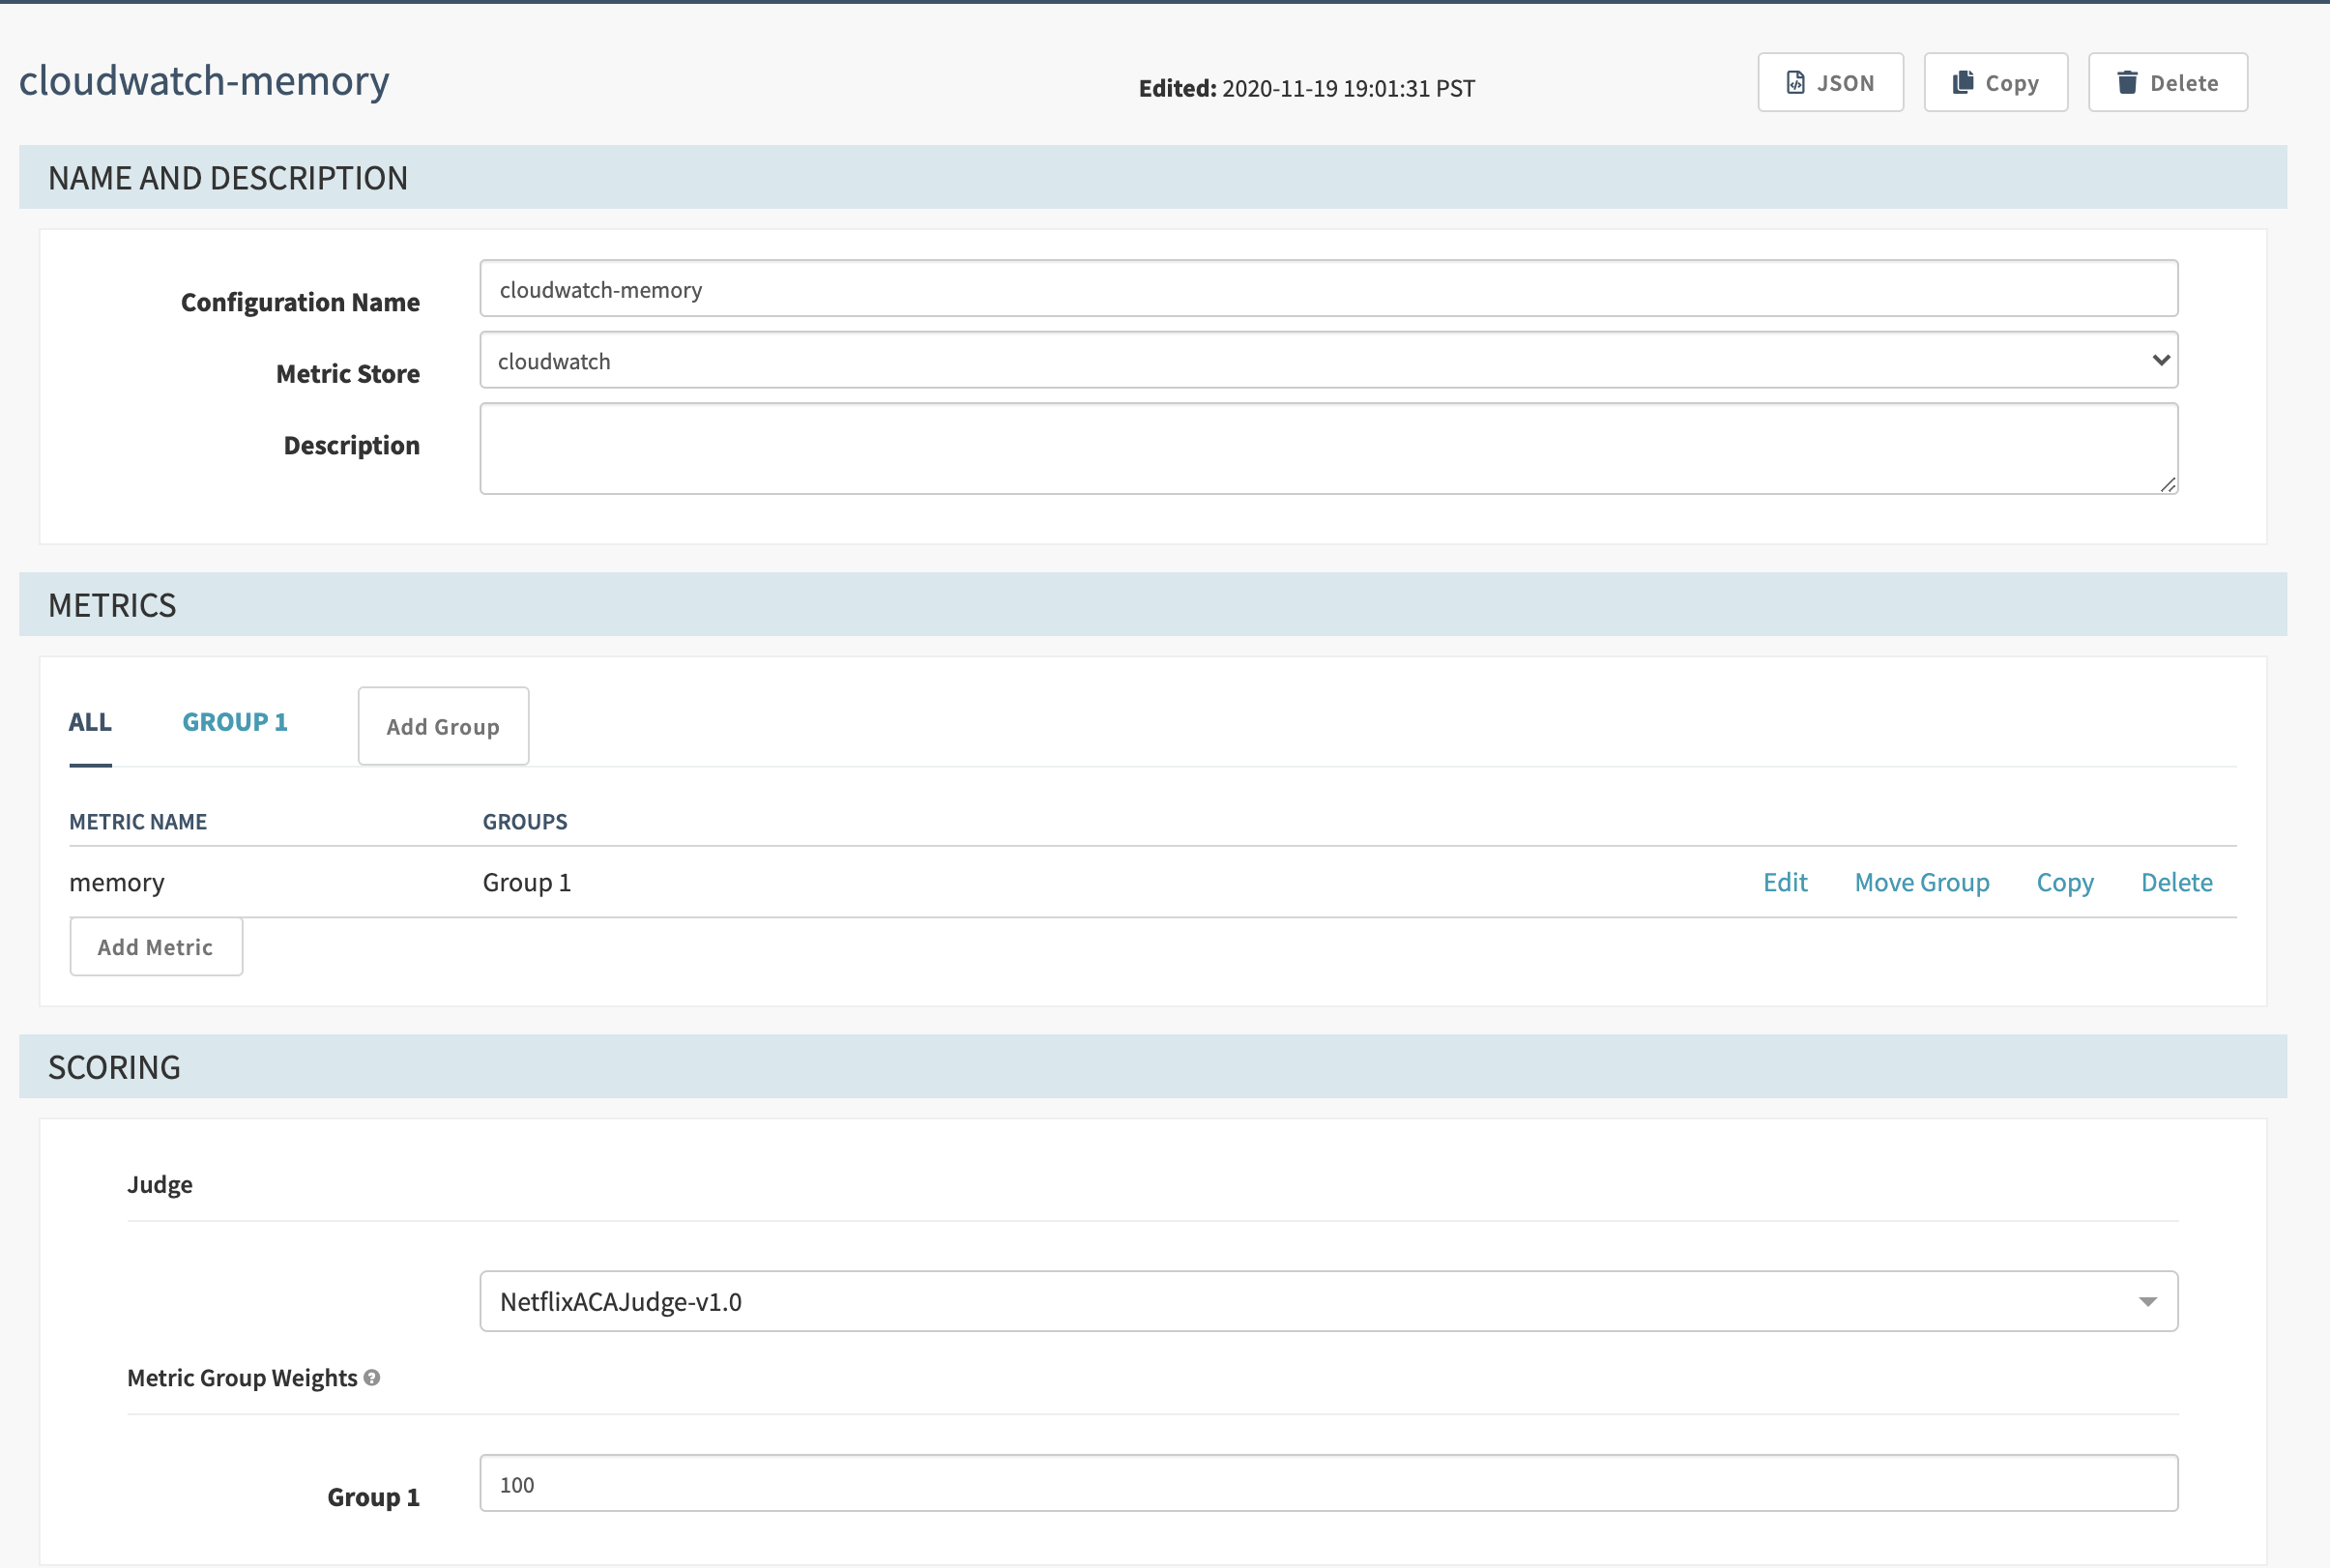
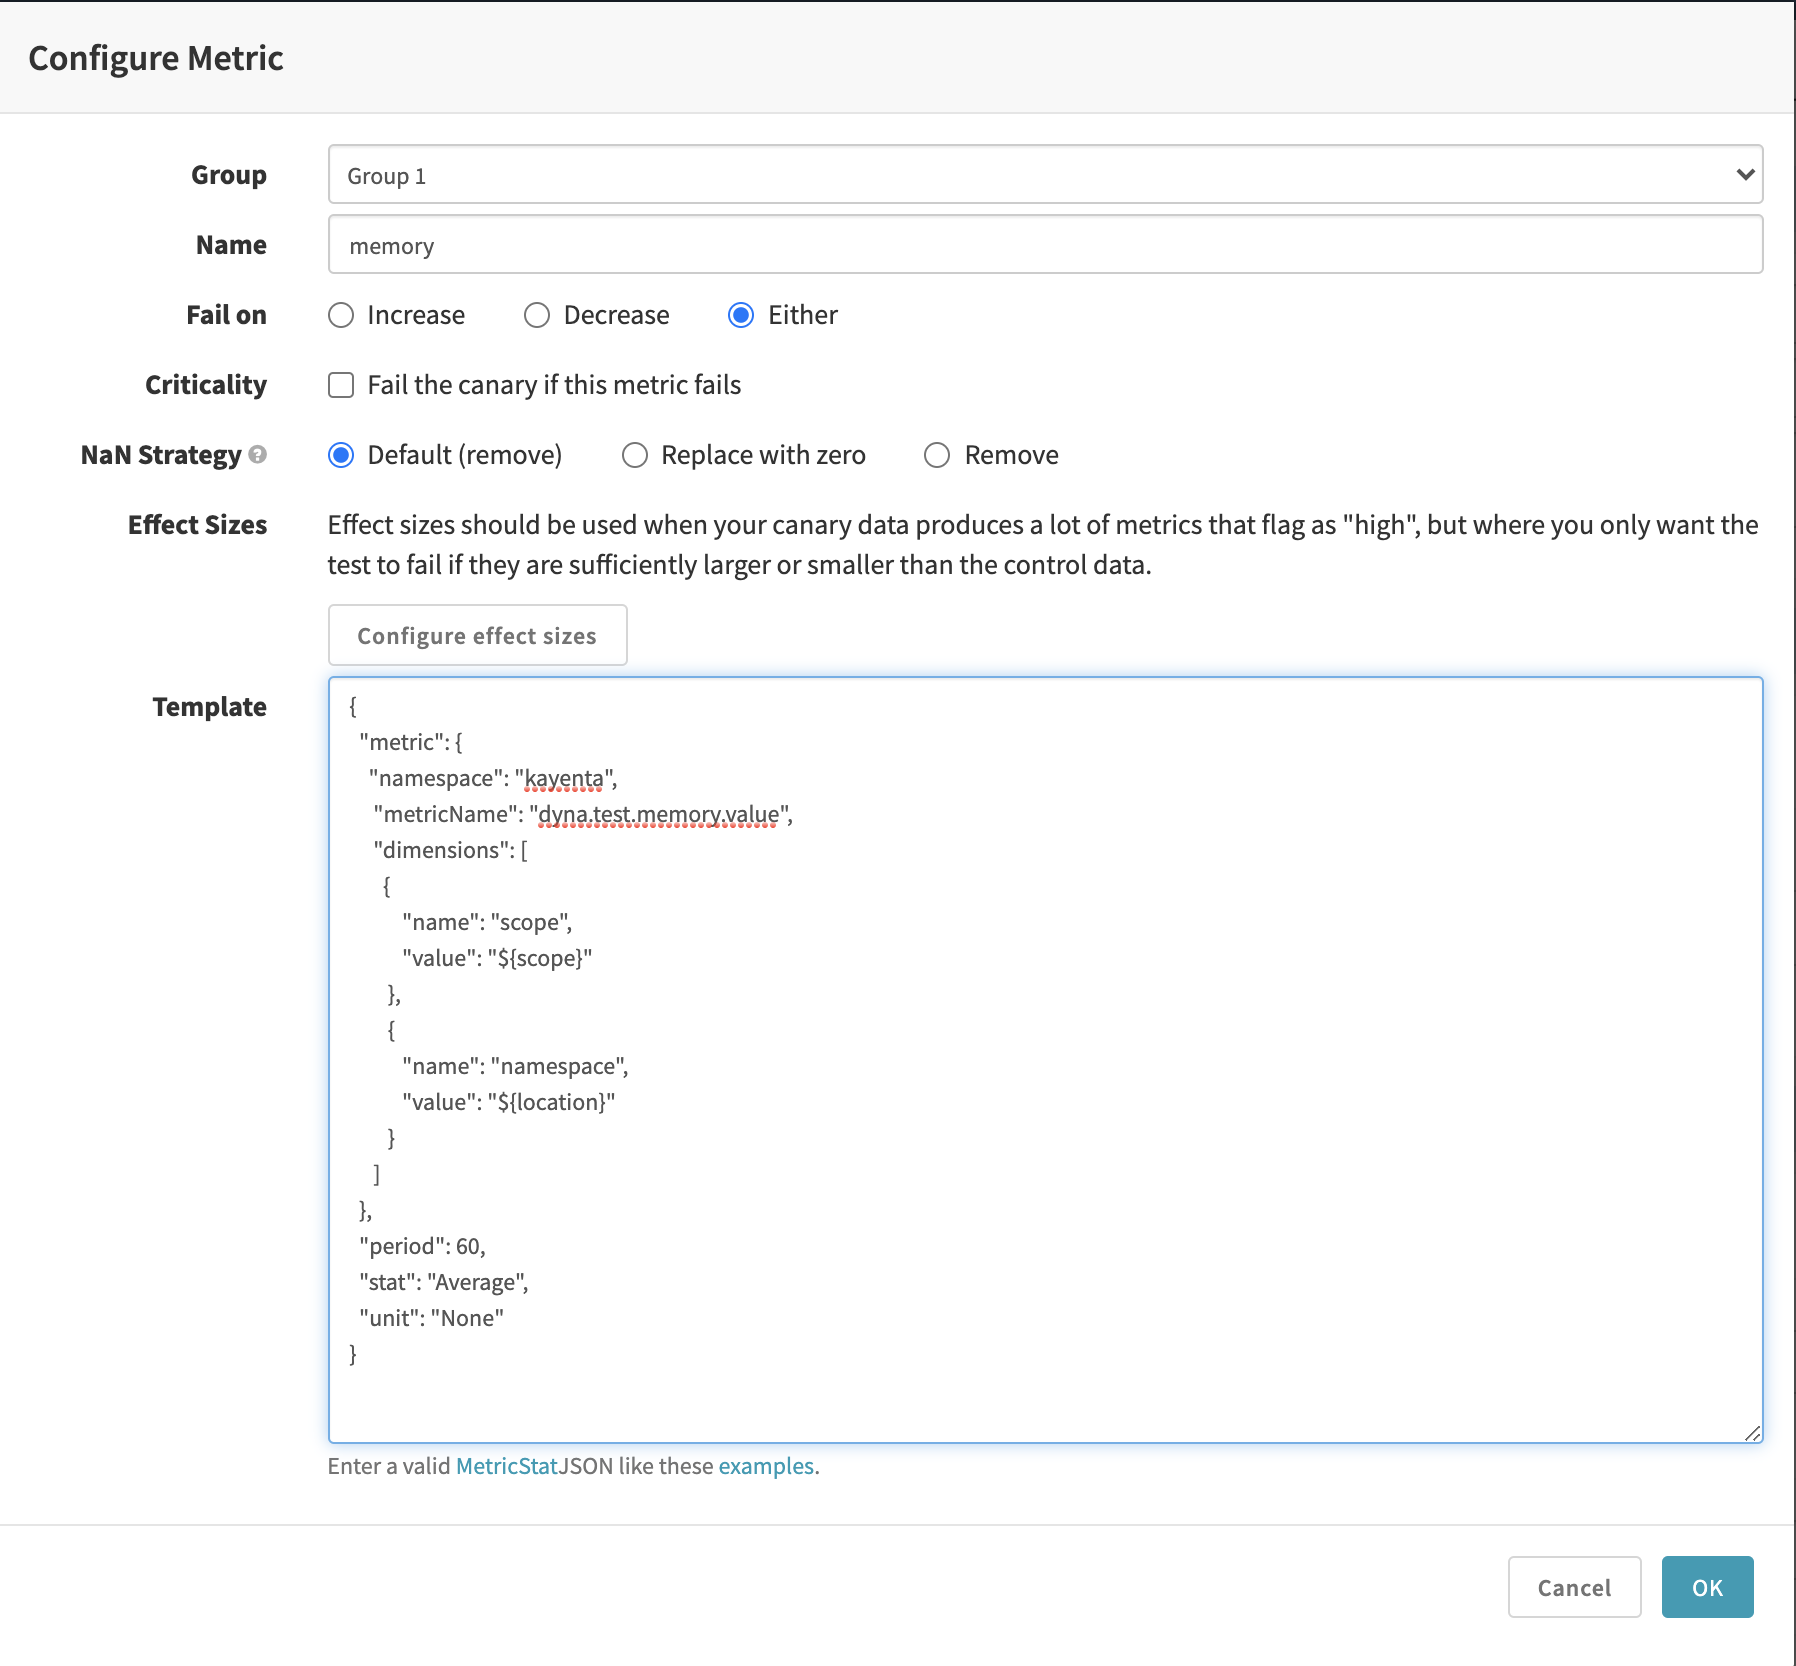
Add your Cloudwatch MetricStat JSON in the Template field.
{
    "Metric": {
        "Namespace": "kayenta",
        "MetricName": "integration.test.cpu.value",
        "Dimensions": [
            {
                "Name": "scope",
                "Value": "myapp-prod-canary-2"
            },
            {
                "Name": "namespace",
                "Value": "prod-namespace-2"
            }
        ]
    },
    "Period": 300,
    "Stat": "Average",
    "Unit": "None"
}
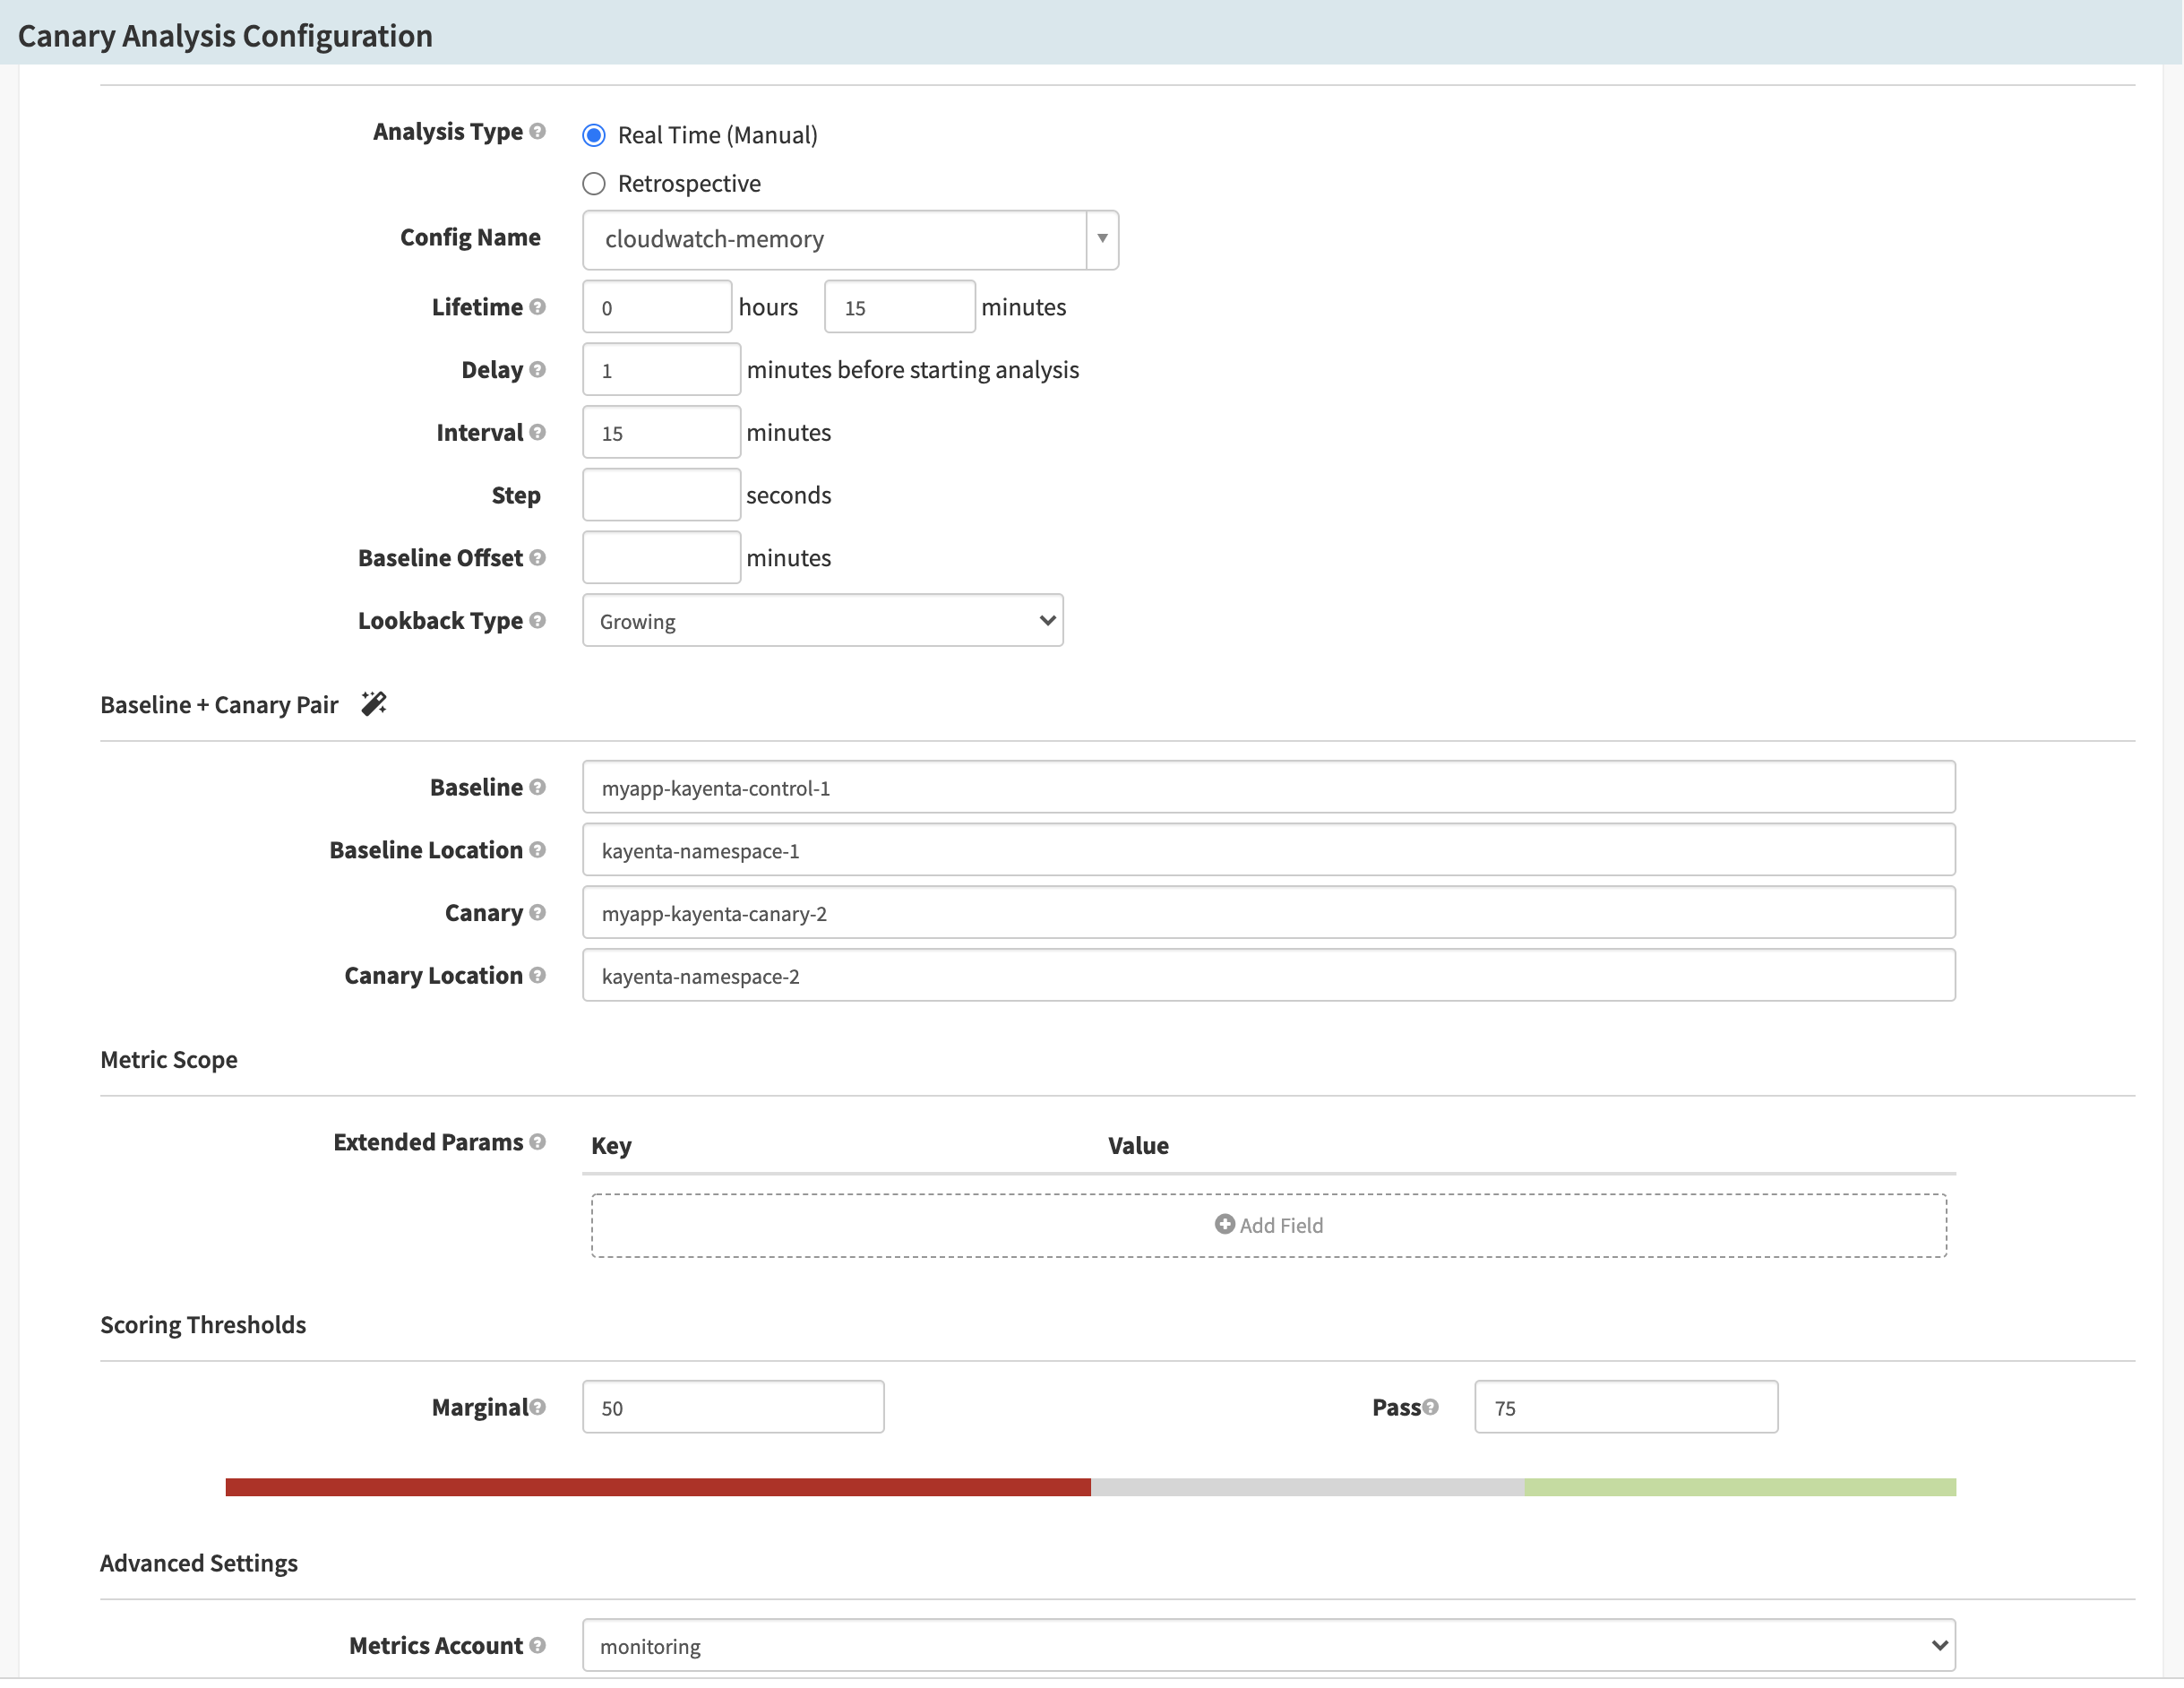
Update pipeline configs
In your canary stage, set up the canary config you just created. Then use the app values from AWS CloudWatch to fill in the Baseline + Canary Pair and MetricScope fields.
Feedback
Was this page helpful?
Thank you for letting us know!
Sorry to hear that. Please tell us how we can improve.
Last modified December 19, 2023: (13976a9f)