Install Pipelines-as-Code in Spinnaker (Spinnaker Operator)
Overview
In this guide, you use the Kustomize files in the spinnaker-kustomize-patches repo to deploy the service and install the plugin. You do need to update the contents of some files.
Compatibility
| Spinnaker Version | Pipelines-as-Code Service Version | Pipelines-as-Code Plugin Version |
|---|---|---|
| 1.30.x | 2.30 | 0.0.5 |
| 1.28.x | 2.28 | 0.0.5 |
| 1.27.x | 2.27 | 0.0.5 |
| 1.26.x | 2.26 | 0.0.5 |
Before you begin
- You are running open source Spinnaker.
- You manage your instance using the Spinnaker Operator and the
spinnaker-kustomize-patchesrepo. If you are using Halyard, see Install Pipelines-as-Code in Spinnaker (Halyard).
Find the files
You can find the Pipelines-as-Code files in the spinnaker-kustomize-patches repo’s plugins/oss/pipelines-as-code directory.
kustomization.yml: Kustomize build filedeployment.yml:spin-dinghyDeployment manifestdinghy.yml: service configpac-plugin-config.yml: plugin configservice.yml:spin-dinghyService manifestspinnaker.yml: Spinnaker service mappingversionsdirectory: contains version-specific values that Kustomize inserts into the manifest during generation
The spinnaker-kustomize-patches/recipes directory contains the example kustomization-oss-pac.yml recipe. You can use that recipe or copy the entries to your recipe. This guide uses the kustomization-oss-pac.yml recipe for examples.
Configure the service
Set your Spinnaker version
Make sure the service version is compatible with your Spinnaker version.
You specify the version in the patchesStrategicMerge section of plugins/oss/pipelines-as-code/kustomization.yml. You can find supported versions in the plugins/oss/pipelines-as-code/versions directory. For example, if you are running Spinnaker 1.27.x, replace ./versions/v-1.28.yml with ./versions/v-1.27.yml.
patchesStrategicMerge:
  - ./pac-plugin-config.yml
  - ./versions/v-1.28.yml
Configure your repo
Important
Configure your repo in theplugins/oss/pipelines-as-code/dinghy.yml file.Before configuring your repos, ensure you have the following:
- A personal access token that has read access to the repo where you store your
dinghyfileand the repo where you storemodulefiles. You should create a Kubernetes Secret for your personal access token so you don’t store the token in plain text in your config file. - The organization where the app repos and templates reside; for example, if your repo is
armory-io/dinghy-templates, yourtemplate-orgisarmory-io. - The name of the repo containing your modules; for example, if your repo is
armory-io/dinghy-templates, yourtemplate-repoisdinghy-templates.
Add the following to your dinghy.yml config:
templateOrg: <repo-org>
templateRepo: <dinghy-templates-repo>
githubToken: <abc>
githubEndpoint: <https://api.github.com>
All fields are required.
templateOrg: VCS organization or namespace where application and template repositories are locatedtemplateRepo: VCS repository where module templates are locatedgithubToken: GitHub token; This field supports “encrypted” field references; see Secrets for details.githubEndpoint: (Default:https://api.github.com) GitHub API endpoint. Useful if you’re using GitHub Enterprise.
GitHub webhooks
Set up webhooks at the organization level for push events. You can do this by going to https://github.com/organizations/<your_org_here>/settings/hooks.
Set
content-typetoapplication/json.Set the
Payload URLto your Gate URL. Depending on whether you configured Gate to use its own DNS name or a path on the same DNS name as Deck, the URL follows one of the following formats:https://<your-gate-url>/webhooks/git/githubif you have a separate DNS name or port for Gatehttps://<your-spinnaker-url>/api/v1/webhooks/git/githubif you’re using a different path for Gate
If your Gate endpoint is protected by a firewall, you need to configure your firewall to allow inbound webhooks from GitHub’s IP addresses. You can find the IPs in this API response. Read more about GitHub’s IP addresses.
You can configure webhooks on multiple GitHub organizations or repositories to send events to Dinghy. Only a single repository from one organization can be the shared template repository in Dinghy. However, Dinghy can process pipelines from multiple GitHub organizations. You want to ensure the GitHub token configured for Dinghy has permission for all the organizations involved.
Pull request validations
When you make a GitHub pull request (PR) and there is a change in a dinghyfile, Pipelines-as-Code automatically performs a validation for that dinghyfile. It also updates the GitHub status accordingly. If the validation fails, you see an unsuccessful dinghy check.
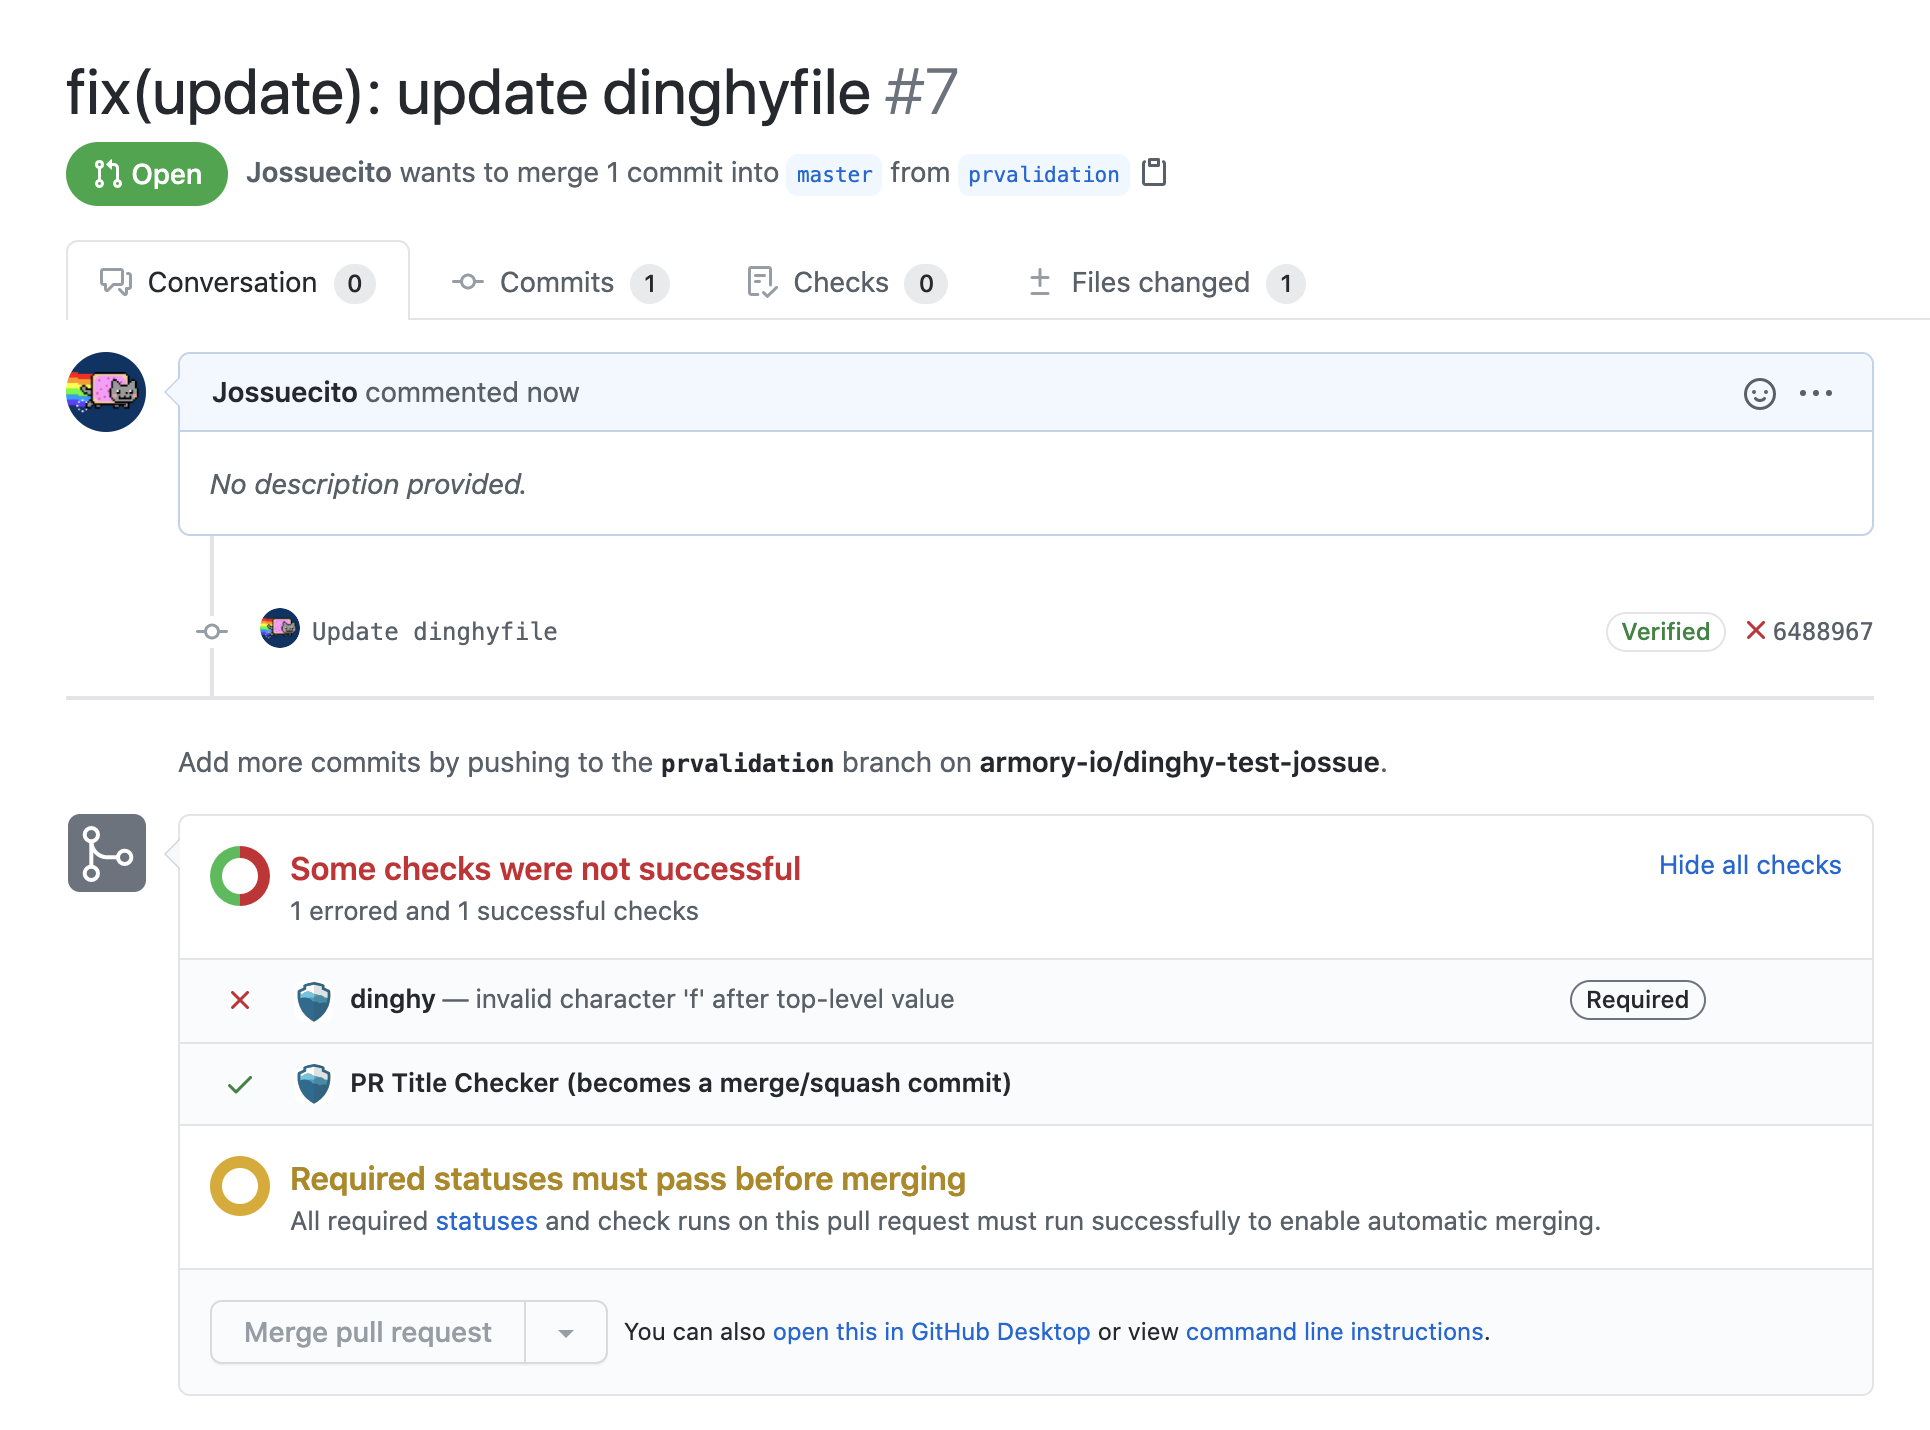
Make PR validations mandatory to ensure users only merge working dinghyfiles.
Perform the following steps to configure mandatory PR validation:
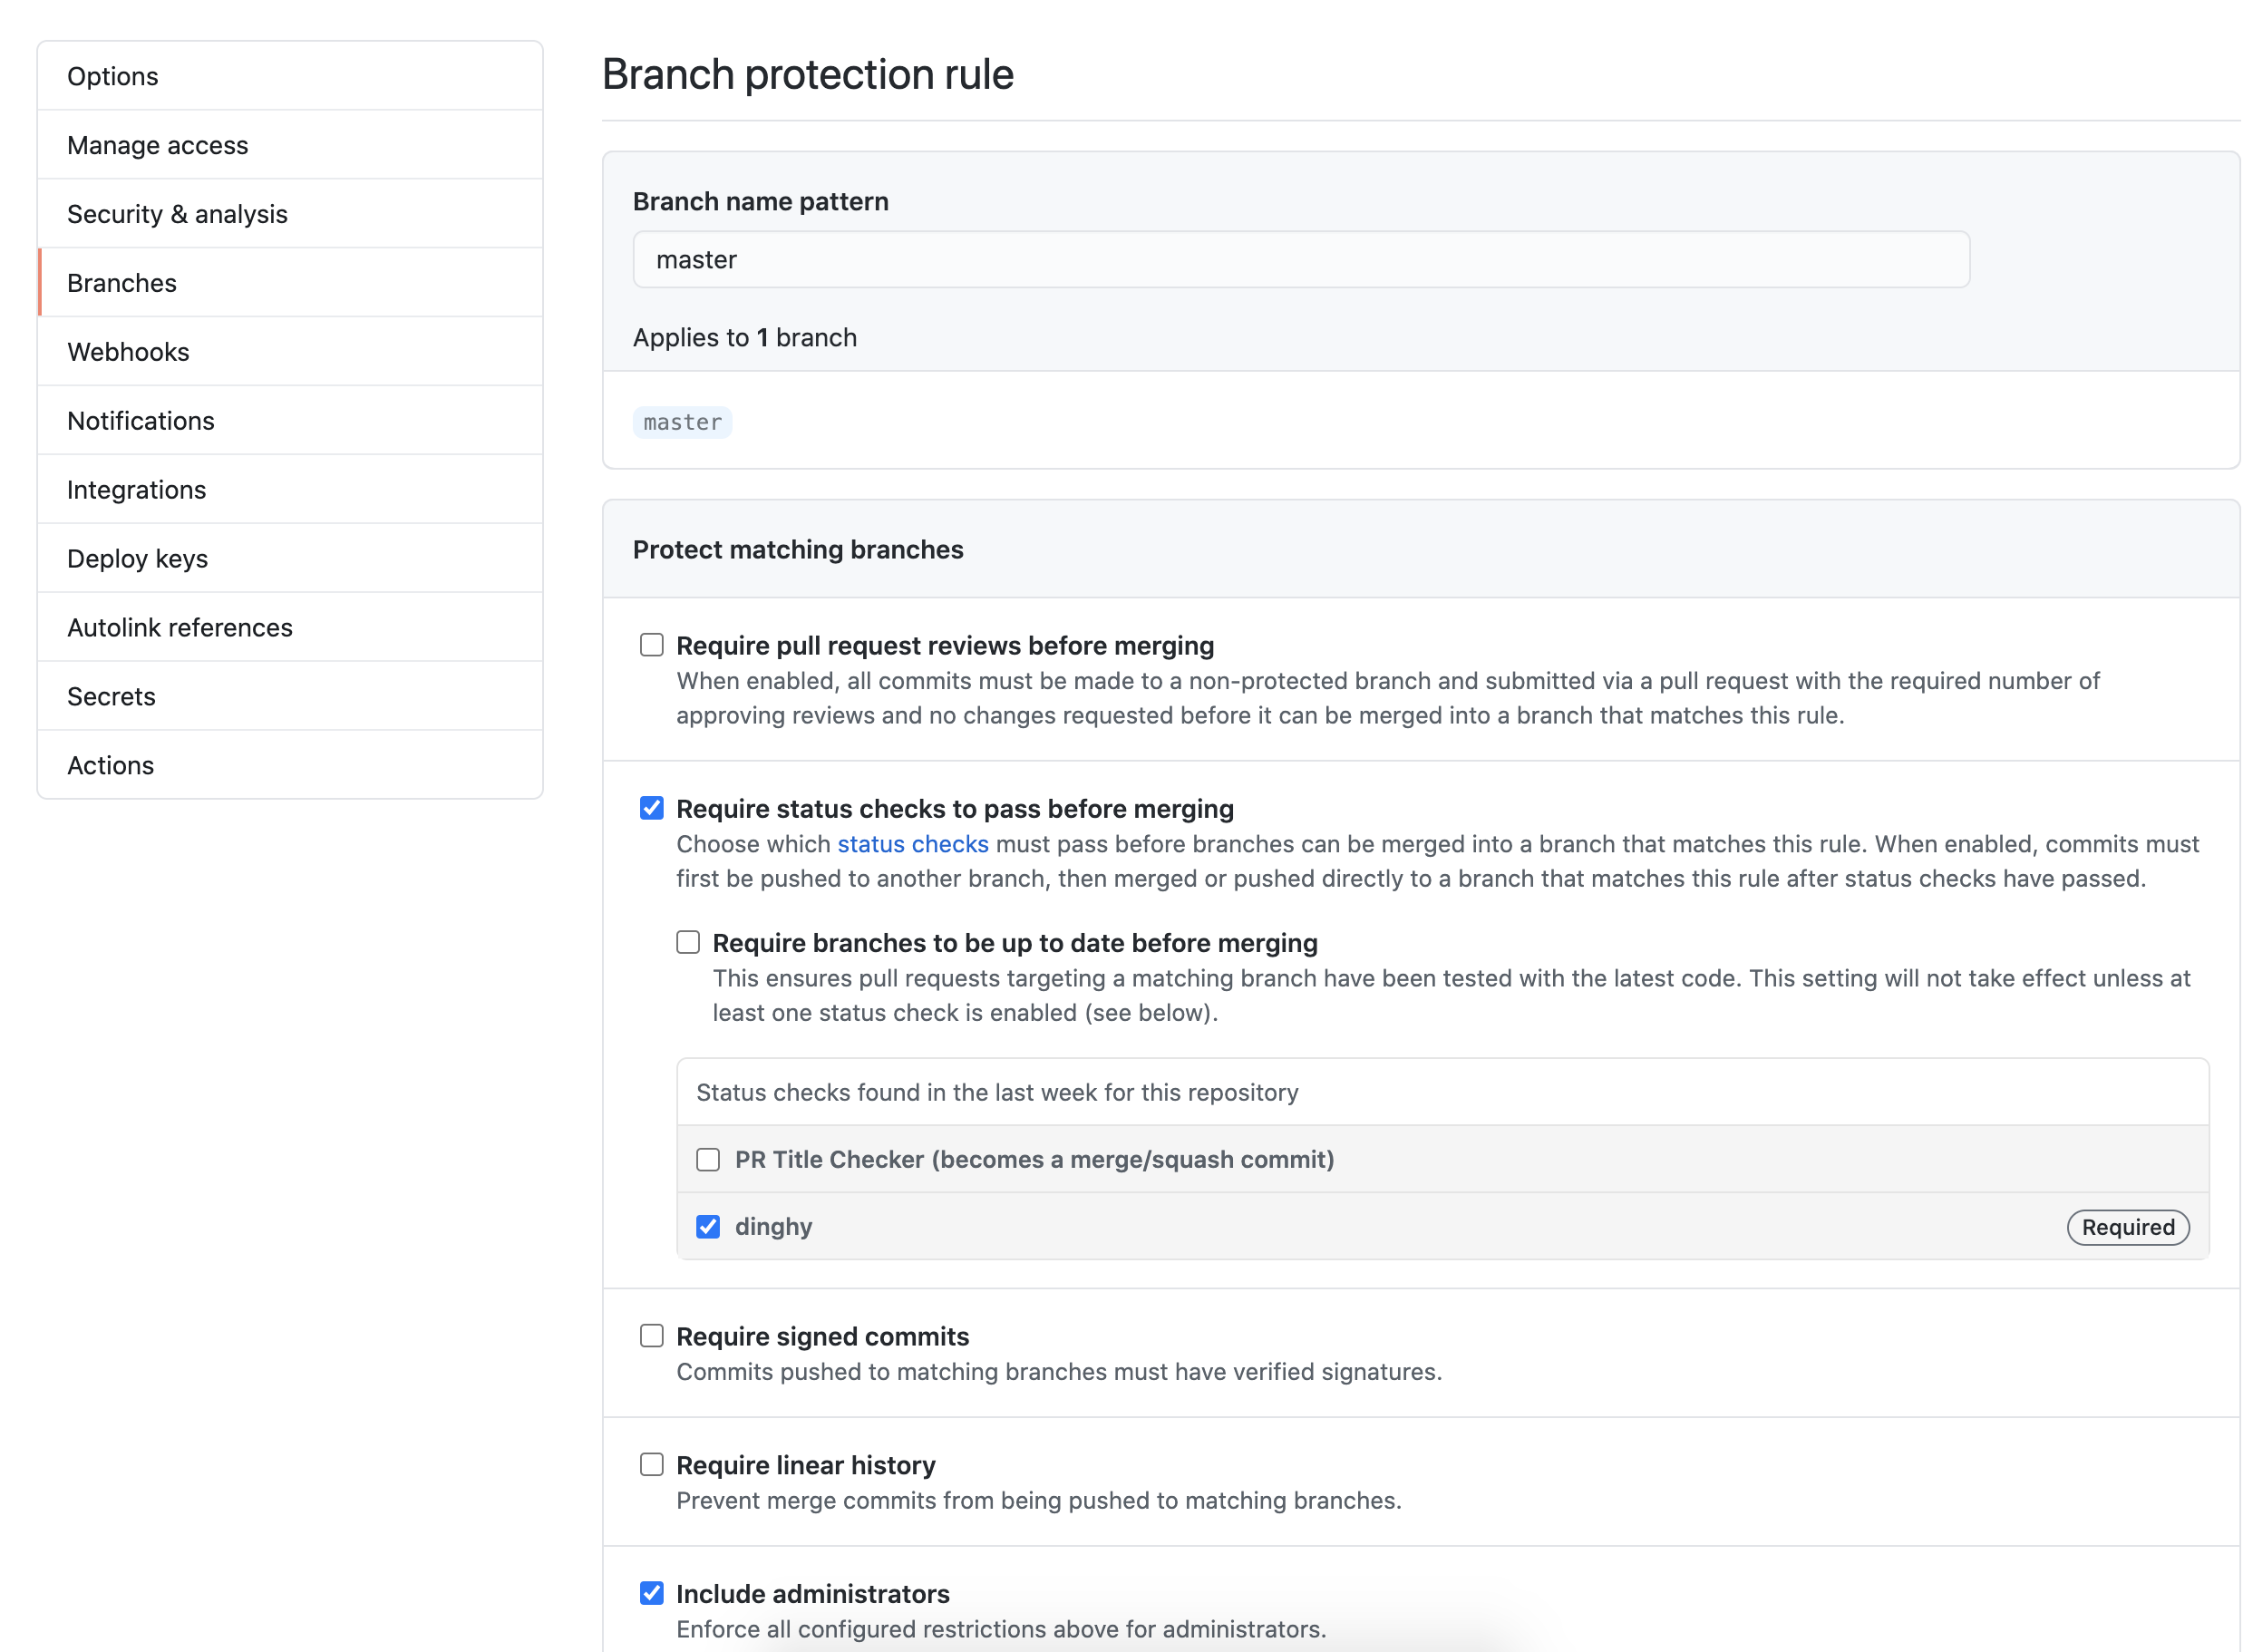
- Go to your GitHub repository.
- Click on Settings > Branches.
- In Branch protection rules, select Add rule.
- Add
masterin Branch name pattern so that the rule gets enforced on themasterbranch. Note that if this is a new repository with no commits, the “dinghy” option does not appear. You must first create adinghyfilein any branch. - Select Require status checks to pass before merging and make dinghy required. Select Include administrators as well so that all PRs get validated, regardless of user.
The following screenshot shows what your GitHub settings should resemble:
Bitbucket has both cloud and server offerings. See the Atlassian docs for more on the name change from Stash to Bitbucket Server. Consult your company’s Bitbucket support desk if you need help determining what flavor and version of Bitbucket you are using.
Add the following to your dinghy.yml config:
templateOrg: <repo-org>
templateRepo: <dinghy-templates-repo>
stashUsername: <stash_user>
stashToken: <abc>
stashEndpoint: <https://my-endpoint>
All fields are required.
templateRepo: VCS repository where module templates are locatedstashUsername: Stash usernamestashToken: Stash token. This field supports “encrypted” field references; see Secrets for details.stashEndpoint: Stash API endpoint. If you’re using Bitbucket Server, update the endpoint to include the api e.g. https://your-endpoint-here.com/rest/api/1.0
If you’re using Bitbucket Server, update the endpoint to include the api, e.g.
--stash-endpoint https://your-endpoint-here.com/rest/api/1.0
You need to set up webhooks for each project that has the dinghyfile or module separately. Make the webhook POST to: https://spinnaker.your-company.com:8084/webhooks/git/bitbucket. If you’re using Stash <v3.11.6, you need to install the webhook plugin to be able to set up webhooks.
Add the following to your dinghy.yml config:
templateOrg: <repo-org>
templateRepo: <dinghy-templates-repo>
gitlabToken: <abc>
gitlabEndpoint: <https://my-endpoint>
All fields are required.
templateOrg: VCS organization or namespace where application and template repositories are locatedtemplateRepo: VCS repository where module templates are locatedgitlabToken: GitLab token. This field supports “encrypted” field references; see Secrets for details.gitlabEndpoint: GitLab endpoint
Under Settings -> Integrations on your project page, point your webhooks to https://<your-gate-url>/webhooks/git/gitlab. Make sure the server your GitLab install is running on can connect to your Gate URL. Armory also needs to communicate with your GitLab installation. Ensure that connectivity works as well.
Configure the plugin
In pac-plugin-config.yml, make sure the version number is compatible with your Spinnaker instance.
Show the manifest
#------------------------------------------------------------------------------
# Example configuration for enabling the Pipeline as a Code plugin
#------------------------------------------------------------------------------
apiVersion: spinnaker.armory.io/v1alpha2
kind: SpinnakerService
metadata:
  name: spinnaker
spec:
  spinnakerConfig:
    profiles:
      # Configs in the spinnaker profile get applied to all services
      spinnaker:
        spinnaker:
          extensibility:
            repositories:
              repository:
                enabled: true
                url: https://raw.githubusercontent.com/armory-plugins/pluginRepository/master/repositories.json
      gate:
        spinnaker:
          extensibility:
            plugins:
              Armory.PipelineAsACode:
                enabled: true
                version: 0.0.5
      echo:
        armorywebhooks:
          enabled: true
          forwarding:
            baseUrl: http://spin-dinghy:8081
            endpoint: v1/webhooks
        spinnaker:
          extensibility:
            plugins:
              Armory.PipelineAsACode:
                enabled: true
                version: 0.0.5
Deploy
This step deploys the Dinghy service and installs the plugin. If you want to see the generated manifest before you deploy, execute kubectl kustomize.
Apply the updates to your Kustomization file.
kubectl apply -k <kustomization-directory-path>
What’s next
Feedback
Was this page helpful?
Thank you for letting us know!
Sorry to hear that. Please tell us how we can improve.
Last modified August 17, 2023: (525a0c04)